Last Updated on November 8, 2022
A refrigerator is a great kitchen appliance. It keeps food fresh, safe from insects and rodents, and helps us save time and energy. In addition, refrigerators come in various sizes and shapes, and each has its own unique features.
There are two types of refrigerators: side-by-side and bottom mount. Side-by-side models are usually larger and have a wider opening at the top. Bottom-mount refrigerators tend to be smaller and have a narrower opening at the top.
Refrigerators also come with temperature settings ranging from coldest (0°F) to warmest (45°F). The ideal setting depends on the type of food you want to store. For example, foods that require less cooling should be stored at 0°F or colder. Foods that require warmer temperatures should be kept between 40°F and 45°F.
How Do You Set the Temperature on a GE Refrigerator?
To set the temperature for your refrigerator, follow these steps:
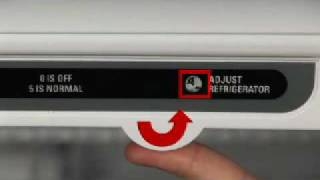
1. Press the power button located near the front door handle.
2. Select the desired temperature by pressing the buttons on the control panel until they light up.
3. Press the OK button to lock in the new temperature.
4. If you need to adjust the temperature again, repeat Steps 1 through 3.
5. Close the refrigerator door.
6. Wait about 15 minutes before opening the door to check if the temperature has been adjusted properly.
7. If it hasn’t, press the power button again and select another temperature.
8. Repeat Step 7 until the temperature is correct.
9. Open the refrigerator door.
10. Check the temperature once more to make sure it is accurate.
11. Enjoy!
Older Models with Analog Double-Control
If your refrigerator uses an analog double-control system, you can clean the coils manually. Follow these steps:
1.) Remove the back cover of the refrigerator.
2.) Unscrew the screws holding the coil assembly in place.
3.) Pull out the coil assembly.
4.) Use a soft cloth to wipe down the coils.
5.) Replace the coil assembly into the refrigerator.
6.) Screw the screws back into place.
7.) Reinstall the back cover.
8.) Turn on the refrigerator.
9.) Check the temperature to see if it has changed.
10.) If not, continue cleaning the coils as needed.
11.) When finished, turn off the refrigerator and remove the back cover.
12.) Wipe down the coils one last time.
13.) Replace the back cover.
14.) Turn on the refrigerator and enjoy!
Newer Models With Digital Single-Control
If your fridge uses digital single-control, there is no way to clean the coils manually. However, you can use a vacuum cleaner to clean them. Follow these steps:.
1.) Remove the refrigerator’s back cover.
2.) Vacuum the coils using a small brush attachment.
3.) Replace the back cover and turn on the refrigerator.
4.) Check the temperature to ensure it has been corrected.
5.) Continue vacuuming the coils as necessary.
6.) Once done, replace the back cover.
7.) Turn on the refrigerator to enjoy.
Turning the Cooling Function of the Refrigerator Off and On
You may notice that when you open the refrigerator door, the compressor turns on automatically. This is called the “automatic” function. It helps keep the interior cool during hot summer days.
However, this feature can cause problems. For instance, it could overheat the refrigerator and shorten its life. Also, it could increase energy consumption. Therefore, we recommend turning this feature off. Here’s how:
1.) Press the power button located at the bottom right corner of the refrigerator.
The display will show the current setting.
2.) Select the option “Cooling”.
3.) Press the OK button to save the change.
4.) Close the refrigerator door. The cooling function should be turned off now.
5.) Open the refrigerator door. The compressor won’t run unless you tell it to.
6.) Enjoy!
Adjusting the Humidity Level in a GE Refrigeration Unit
Humidifiers are used to add moisture to air. They help prevent dryness inside refrigerators. You can adjust the humidity level by following these steps:
1) First, turn on the humidifier.
2) Next, set the desired humidity level.
3) Finally, press the OK button.
Enjoy!
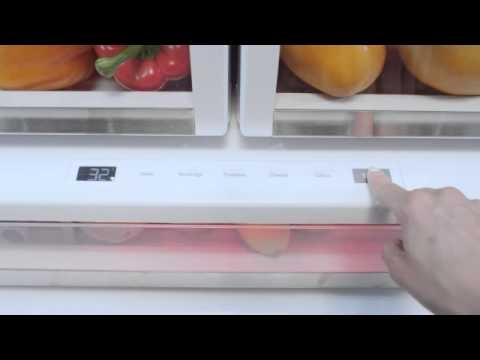
LCD Model – Temperature Adjustment for the Fresh Food Compartment
To adjust the fresh food compartment temperature, follow these steps:
1. Press the power button located on the front panel of the refrigerator.
A menu screen will appear.
2. Select the option “Temperature”.
3. Choose the desired temperature from the list.
4. Press the OK button to confirm the selection.
5. Press the power button again to return to the main menu.
6. Press the OK button once more to exit the menu.
Enjoy!
LCD Model – Temperature Adjustment for the Freezer Compartment
To adjust freezer compartment temperature, follow these instructions:
1. Press and hold the power button until the LCD displays the settings.
2. Select “Freezer”.
3. Choose a desired temperature from the list displayed.
4. Press and release the power button to select the new setting.
5. Press and release the OK button to confirm.
Enjoy!
Temperature Control on Monogram Models
Monogram models have two separate temperature controls. One control adjusts the temperature of the fresh food compartment while the other controls the freezer compartment.
For example, if you want to adjust the temperature of the fresh foods, first press the power button. A menu screen will appear. Then, choose the option “Fresh Foods”.
Next, choose a desired temperature from the available options. Press the OK button.
Next, press the power button again to go back to the main menu. Now, choose the option “Freezer”. Follow the same procedure as above.
Enjoy!
Adjusting the Temperature Setting Using the Remote Control
If you use an infrared remote control to operate your refrigerator, you’ll need to know how to adjust the temperature setting using the remote control.
First, make sure that the remote is connected to the refrigerator.
Next, press and hold the power button on the remote until the LCD shows the settings.
Choose the option “Temperature” from the list.
Press the OK button to confirm your choice.
Now, press the power button on the refrigerator again to return to the menu.
Select the option “Refresh”.
Finally, press the OK or ENTER button to exit the menu.
Are you looking for a quick guide on how to adjust temperature in a GE refrigerator?
If yes, then you came to the right place.
This article will teach you how to adjust temperature in your fridge.
GE is one of the leading manufacturers of refrigerators in the world.
They offer a wide range of appliances from basic models to high-end ones.
Their refrigerators come with features such as adjustable temperature settings, water dispensers, ice makers, and much more.
Adjusting the temperature in your refrigerator is very important because it affects the freshness of food.
The temperature should be adjusted according to the type of food you want to store.
For example, if you want to store meat or fish, you should lower the temperature.
On the other hand, if you want to preserve fruits and vegetables, you should raise the temperature
How To Adjust Temperature in a GE Refrigerator
Refrigerators are designed to maintain a constant temperature throughout the house. This is done by using a thermostat that controls the compressor motor. A refrigerator thermostat is located near the door handle. It is usually set between 32°F and 45°F. The thermostat uses a mercury switch to detect the temperature. When the temperature reaches the desired level, the thermostat sends a signal to the compressor motor to turn off. The compressor motor turns on again after a certain period of time. The compressor motor runs continuously until the thermostat detects a lower temperature.
Adjusting Temperature Controls on GE Profile Model
To adjust the temperature of the refrigerator, follow these steps: 1 Press the power button 2 Turn the dial clockwise to increase the temperature 3 Turn the dial counterclockwise to decrease the temperature 4 Press the power button again to save the new setting 5 Repeat steps 1-4 to change the temperature back to the original setting.
LCD Model – Temperature Adjustment for the Fresh Food Compartment
To adjust the temperature of the fresh food compartment, follow these steps:1 Press the power button2 Turn the dial clockwise until the desired temperature is reached3 Press the power button again and the unit will return to the previous setting
LCD Model – Temperature Adjustment for the Freezer Compartment
To adjust the temperature of the freezer compartment, follow these steps 1 Press the power button 2 Turn the dial clockwise to select the desired temperature 3 Press the power button again to set the desired temperature
Temperature Adjustment for Non-LCD Models
To adjust the temperature of the non-LCD model, press the power button twice and turn the dial clockwise until the desired temperature is reached.
Adjusting the Cooling System on a GE Profile LCD Model
To adjust the cooling system on a GE profile LCD model, press the power/on button three times within 30 seconds. Turn the dial clockwise until you reach the desired temperature.
Adjusting the Cooling System on a GE Profile Non-LCD Model
To adjust the cooling system on non-LCD models, press the power/off button five times within 30 seconds. Then turn the dial clockwise until the desired temperature is reached.
Temperature Control on Monogram Models
To adjust the temperature on monogram models, press the power button three times within 30 seconds. Turn the dial clockwise until you reach the desired setting.

It's knowing what you're doing and having a good basic foundation.
That's why my mission is to teach you the fundamentals of great cooking...
So you can start creating delicious dishes without any rules or restrictions whatsoever.
With my step-by-step instructions, my unique insider secrets and techniques,
You'll be able to easily take ordinary food and make it extraordinary!
- How to Prolong the Life of Your Kitchen Appliances - December 22, 2024
- How Long does Yogurt Take to Freeze - May 5, 2023
- Top 10 best restaurants in Montana - May 1, 2023