Last Updated on November 8, 2022
Have you ever wondered why LG appliances break down after a certain period of time? You don’t even need special tools or skills!

LG appliances are known for their reliability and high quality. Every year, millions of customers worldwide trust LG appliances because they provide outstanding performance at an affordable price.
This quick reference guide helps readers identify issues that might occur during their appliance life cycle. With detailed explanations and step-by-step instructions, you’ll be able to troubleshoot common problems such as power surges, water leaks, low refrigerant levels, and more. Whether you want to replace the compressor, repair a faulty light bulb, or simply clean out some sediment from the evaporator coil, this guide covers it all.
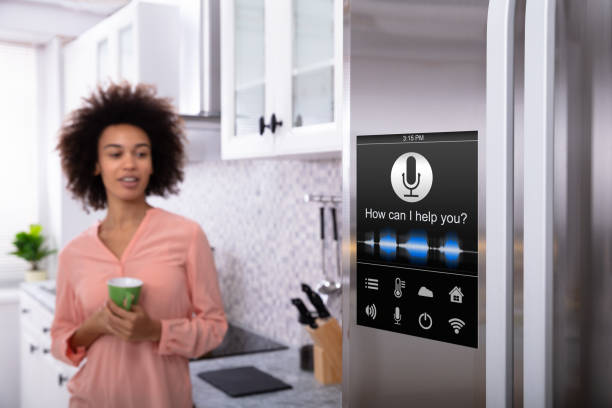
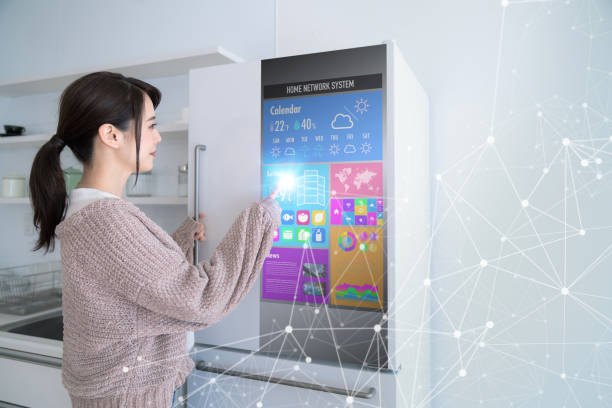
How to Use Smart Diagnosis on LG Refrigerator?
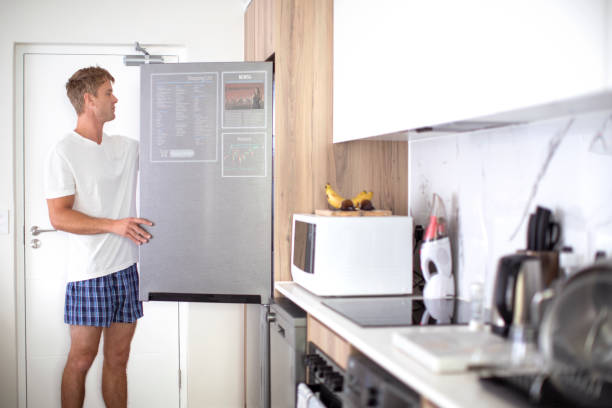
LG refrigerator models are known for being easy to use and maintain. You might want to clean out the condenser coils or replace the evaporator fan motor. In such cases, you’ll need to know how to access specific components inside the fridge.
Step 1:
1. Open the door of the refrigerator.
2. Turn off the compressor.
3. Remove the cover panel above the freezer compartment.
4. Pull the ice maker tray out of the freezer compartment.
5. Lift up the bottom panel of the freezer compartment. You’ll see a small hole near the front edge of the unit. This is where the evaporator fan motor is located.
6. Locate the fan motor. If you’re unsure about where to look, turn on the light switch next to the fan motor. The lights will illuminate.
Step 2 – “Touch the mic icon.”
The next step involves touching the microphone icon on your smartphone. You’ll hear a loud chirp, followed by a recording of what you say.
Once you’ve recorded your voice, it’s time to click the Start button. An on-screen notification lets you know that your refrigerator is now listening.
“Step 4” – “Wait for the chime.”
You’ll hear a sound once the analysis is completed.
Step 5 – “Analyze”
Open the right refrigerator door and put your phone next to the brand logo. Touch the record icon on your mobile device. See a red circle pop up. Tap it to begin recording.
Now you’re ready to analyze.
Touch the start button on the refrigerator to begin analyzing.
You’ll see a list of items in the fridge and a bar graph showing how much food each item needs.
The system uses machine learning to identify what foods will likely go bad soonest. For example, the system will tell you if there’s something wrong with the milk.
If you want to know why certain items aren’t being used, tap the info button to learn more about the food.
To add more products, just open the app again.
Step 6 – How To Create A Countdown Timer Without Using Code Or Creating A Web Service
If you want to ensure people don’t miss important events, you’ll probably use a countdown timer. You could either build one yourself or find a ready-made solution online. If you’ve ever used a countdown timer, you know how annoying it is to wait for something to finish counting down. But what if you’re running out of time? What if you just wanted to tell someone that something is happening soon?
You might think you’d have to write some JavaScript or build a web service to do this, but you actually don’t. You can use a simple audio file called “step.”
The step format is pretty straightforward. It consists of three parts:
1. A start tone
2. An end tone
3. A pause tone
When played together, these three sounds indicate the beginning and end of the countdown.
Error Codes – How to diagnose?
Er CF
A common problem with refrigerators is the compressor clutch. This part controls the flow of air into the evaporator coil. If it fails, you’ll see a “CF Error Code 5.”
The fan motor is located near where the compressor is mounted. You’ll find it under the unit. Three screws hold the panel together; remove those and pull off the entire panel. Look inside the area behind the fan motor, and you’ll find the clutch assembly. Remove the cover plate to access the clutch.
Er d5 or Er dS
The Boleslavsky Variation of the Sicilian Defence is one of the most popular openings in chess history. It is often considered the best opening move ever played. This variation was named after Mikhail Botvinnik, who used it against Bobby Fischer in their famous match in Reykjavík in 1972.
In the game, Black plays…d5, while White plays c4. The main idea behind this move is to open up lines along the e1–g7 diagonal. The white bishop takes over the role of the knight, moving into position to attack the black king. However, Black gets some counterplay on his kingside, thanks to his rook.
Er FS or Er F5
Er gf or er f fail? Do you know what it means?
If you’re having trouble finding the cause of a problem, you’ll want to check the following things:
1. Check the battery terminals.
2. Make sure there are no loose wires.
3. Look for signs of corrosion.
4. Is the hood open?
5. Is the radiator cap off?
6. Does the fan spin?
7. Are the lights working?
8. How about the headlights?
9. What about the tires?
10. Have you checked under the hood?
Er gf or er f failure? Do you know what this means?
If the parts don’t work correctly, replace them. You should never try to fix a problem yourself unless you’ve been trained to do so. And even then, make sure you know exactly what you’re doing.
Er H5 or Er HS
The most common cause of an overheating problem is a faulty heat exchanger. This is usually caused by a defective fan motor or a clogged air filter. If you notice smoke coming out of the exhaust pipe, there may be problems with the catalytic converter. Check the coolant level and replace it if necessary.
Check the thermostat housing for cracks or leaks if the temperature gauge reads high. Also, check the hoses connecting the heater core to the thermostat housing. There might be a leak somewhere. You can test the system by turning off the ignition switch and opening the hood. If the engine does not start, turn the key again and wait about 30 seconds. Then close the hood and try starting the car again. If the engine starts, repeat the process to find the source of the problem.
Another reason for overheating is too much water in the cooling system. Remove the hose leading to the overflow tank and let the water run into the ground. Replace the hose and tighten the connection. Ensure the radiator cap is tight and the drain plug is accessible.
A third possibility is that the heater core is blocked. Turn off the power to the heater and open the hood. Disconnect the positive battery cable from the negative post on the starter solenoid. Release the parking brake and allow the engine to idle while holding down the accelerator pedal. Let go of the gas pedal and observe what happens. If the engine stops running, release the brakes and restart the car. Repeat the procedure several times. Remove the spark plugs and clean the combustion chamber if the engine still won’t start. Reinstall the plugs and retest.
The heater core is likely damaged if none of the above remedies work. Take the car to a repair shop.
Are you having trouble finding the right LG refrigerator model?
This guide will help you identify the right LG refrigerator model for your home.
LG Electronics has been at the forefront of innovation since its founding in 1969.
Today, LG continues to develop innovative technologies that meet consumers’ changing lifestyles and expectations.
The company offers a wide range of refrigerators, washing machines, air conditioners, LED TVs, smart appliances, mobile devices, and air purifiers under various brands such as LG, Midea, Hanwha, Haier, Onkyo, Samsung, Sharp, Toshiba, TCL, and Vu.
This quick guide will help you identify your LG refrigerator model
How to Use Smart Diagnosis on LG Refrigerator
LG refrigerator smart diagnosis is a useful tool that allows you to check the status of your LG refrigerator. It provides information about the current state of your fridge. This includes how full it is, if it is running properly, and whether any problems have been detected. To access the smart diagnostic feature, follow these steps: 1. Press the power button until the display turns off. 2. Press and hold the ‘Menu’ button for 2 seconds.
LG Refrigerator Smart Diagnosis Codes
If you see the following error message while trying to open the smart diagnostics menu, then you need to reset the system. Error code: 0x8007001F Reset the system Press and hold the power button for 10 seconds. After pressing the power button again, press and hold the Menu button for 2 seconds. Then select the option “Smart Diagnostic” from the main screen.
1. Er 15 or Er IS
This error occurs if the refrigerator door sensor is malfunctioning. To fix this issue, follow these steps: • Press and hold the Power button for 10 seconds. This resets the system.
2. Er 67
67 is a common error code for refrigerators. It indicates that the compressor is not working properly. To resolve this problem, check whether the power cord is plugged into the wall socket correctly. If the power cord is loose, try plugging it back into the wall outlet. If the problem still persists, contact a professional service provider.
3. Er 22
22 is a common error code related to air conditioners. This error code usually occurs because of a faulty fan motor. In order to fix this issue, turn off the air conditioning unit and remove the filter from the air duct. Then, clean the fan blades using a brush. After cleaning, replace the filter and reattach the air conditioning unit. 4. Er 12 12 is a common error code associated with dishwashers. Dishwasher errors occur because of a faulty drain pump. To repair this issue, unplug the appliance from the electrical source and open the door. Remove the drain hose from the sink. Clean the drain pump using a brush. Replace the drain hose and reconnect the dishwasher to the electrical source.
4. OF F
OF F is a common error code that indicates that the refrigerator compressor has stopped working. The problem could be caused by a broken belt or a bad capacitor. To fix this issue, disconnect the power supply and check if the compressor is still running. If not, replace the belt or capacitor. 5. Er 14 14 is a common error code indicating that the freezer has stopped working. This error code usually happens because of a faulty thermostat. To fix this issue simply reset the thermostat.
5. Er CF
CF stands for Cooling Fan. It is used to cool down the interior of the fridge. The fan runs continuously to circulate air inside the fridge. If the fan does not run properly, the cooling system will stop functioning. The fan motor needs to be replaced. 6. Er 13 13 is a common error code meaning that the ice maker has stopped working. This problem occurs because of a faulty circuit board. To repair this issue, remove the panel from the back of the fridge and replace the circuit board.
6. Er dH
dH stands for Defrost Heater. This is a heating element that warms up the freezer compartment to melt any frozen items inside the freezer. If the defrost heater stops working, the freezer will no longer function. To fix this issue, check if the defrost heater is plugged into the wall socket. If the plug is loose, tighten it. 7. Er EI EI stands for Energy Inverter. This is a device that converts electricity from AC to DC power. If the inverter fails, the refrigerator will not operate. To fix this issue first, check whether the inverter is plugged into the wall outlet. If the plug is loosened, tighten it. Then, check if the fuse is blown. Replace the fuse if it is damaged.
7. Er CO or Er Co
CO stands for Compressor. A compressor is used to compress air to produce cold air. It works by using a motor to drive a fan that forces air through a coil. If the compressor stops working, the fridge will not cool down properly. To fix this issue check if the compressor is plugged into the wall. If the plug is unplugged, reconnect it. Check if the fuse is blown or the circuit breaker is tripped. Replace the fuse or reset the breaker if necessary. 8. Er ER or Er Re ER stands for Evaporator. An evaporator is a component of the cooling system that removes moisture from the air. If the evaporator stops working, the fridge won’t get cold enough. To fix this issue turn off the power supply to the unit. Then, check if there’s a leak in the ducting. Repair the leak if necessary.
8. Er d5 or Er dS
d5 stands for dehumidifier. Dehumidifiers remove humidity from the air. If this part fails, the fridge will not get cold enough. To repair this issue turn off the electricity to the unit. Then open the door and let the air circulate around the coils. This will help dry out the coils.
9. F dS
F dS stands for fan dehumidifier. Fan dehumidifiers remove humidity by blowing warm air across the coils. If this part fails the compressor will stop working. To fix this problem turn off the power to the unit. Open the door and allow the air to circulate around the coils. It will help dry out the coil. 10. E dS Answer: E dS stands for evaporator dehumidifier. Evaporators remove humidity from the air by cooling the air down. If this part fails then the refrigerator will not get cold enough to chill the food. To fix this problem shut off the power to the system. Open the door and let the cool air circulate around the coils to dry them out.
10. R dS
R dS stands for refrigerant dehumidifier. Refrigerant dehumidifiers remove moisture from the air by using a refrigerant gas such as Freon. If this part fails, the compressor will not run properly. To fix this problem open the door and allow the refrigerant to flow into the condenser. This will lower the temperature of the refrigerant and prevent the compressor from running. 11. C dS Answer: C dS stands for condensate drain. Condensate drains are used to collect any excess water that may accumulate in the condenser during operation. If this part fails it could cause damage to the compressor. To fix this problem, open the door and allow any accumulated water to drain out.
11. Er FS or Er F5
Er FS stands for expansion valve. Expansion valves regulate the flow of refrigerant in order to maintain constant pressure throughout the system. If this part fails the compressor will not operate correctly. To fix this problem turn off the power switch and remove the cap from the top of the unit. Remove the three screws holding the expansion valve in place and replace it with new parts. 12. S cS Answer: S cS stands for superheat coil. Superheat coils are used to reduce the temperature of the refrigeration liquid. If this part fails you will notice a decrease in efficiency. To fix this problem remove the old superheat coil and install a new one.
12. Er H5 or Er HS
Er H5 stands for evaporator heating element. This is the heating element that heats the air in the evaporator. If this part fails it will result in decreased performance. To fix this problem replace the heating element with a new one. 13. Er R4 or Er R3 Answer: Er R4 stands for receiver fan motor. Receiver fans cools down the condenser. If this part fails, the cooling process will be affected. To fix this problem, replace the receiver fan motor with a new one. 14. Er M1 or Er M2
13. Er FF
Er FF stands for filter fan motor. Filter fans blow the dust from the air flow. If this part fails the dust will accumulate in the system and affect the performance. To fix this issue, replace the filter fan motor with a new unit. 15. Er C1 or Er C2 Answer: Er C1 stands for compressor. Compressors compress refrigerant gas into liquid form. If this part fails then the compressor will not function properly. To fix this issue replace the compressor with a new one. 16. Er T1 or Er T2 Answer: Er T1 stands for thermostat. Thermostats regulate the temperature of the evaporator coil. If this part fails to operate correctly, the evaporator coil will not be heated properly. To fix this problem remove the thermostat and install a new one. 17. Er S1 or Er S2
14. Er gF or Er 9F
Er gF stands for gearbox. Gearboxes convert rotational motion into linear motion. If this part fails, the gears will not move smoothly. To fix this issue change the gear box with a new one. 15. Er R1 or Er R2 Answer: Er R1 stands for relay. Relays are used to switch electrical power on and off. If this part fails it will not switch the power on and off. To fix this issue remove the relay and install a new one 16. Er E1 or Er E2 Answer: Er E1 stands for expansion tank. Expansion tanks store excess refrigerant gas during operation. If this part fails there will be no storage capacity left. To fix this issue check if the expansion tank needs to be replaced. 17. Er F1 or Er F2
How do I find the error code on my LG refrigerator?
LG refrigerators have a tendency to give errors. This happens because of a problem with the compressor. The compressor is responsible for cooling the refrigerator. It is very important to check the compressor every month. If you notice any problems with the compressor, contact the service center immediately.
What does Smart Diagnosis mean on LG refrigerator?
Smart Diagnosis is a feature that allows you to diagnose problems with your LG fridge from anywhere using your smartphone. It helps you to troubleshoot issues with your LG fridge remotely. This feature works with Android phones running version 4.4 KitKat or later. To access this feature, go to Settings > About phone > Software information > System updates > Check for system updates > Download update now. Once downloaded, open the app and select “LG Smart Diagnosis”. After selecting the option, you will be asked to enter your mobile number. Then, you will receive a verification code via SMS. Enter the code and click OK. Now, you will see a list of possible issues with your LG fridge. Select the issue you are facing and press the button next to it. A pop-up window will appear asking you to choose between two options – Fix immediately or schedule repair. Choose the latter if you want to schedule a service call.
Why does my LG fridge say error?
LG refrigerators have a series of codes that indicate what problem the unit is having. These codes are located on the back of the door panel. To access these codes, remove the back panel from the fridge door. Once removed, locate the three black lines on the back of the panel. Press down firmly on each line until the LCD screen lights up. This indicates that the code is being read. After reading the code, press the OK button to clear the code. You can now reattach the panel to the door and reset the unit.

It's knowing what you're doing and having a good basic foundation.
That's why my mission is to teach you the fundamentals of great cooking...
So you can start creating delicious dishes without any rules or restrictions whatsoever.
With my step-by-step instructions, my unique insider secrets and techniques,
You'll be able to easily take ordinary food and make it extraordinary!
- How to Prolong the Life of Your Kitchen Appliances - December 22, 2024
- How Long does Yogurt Take to Freeze - May 5, 2023
- Top 10 best restaurants in Montana - May 1, 2023