Last Updated on November 8, 2022
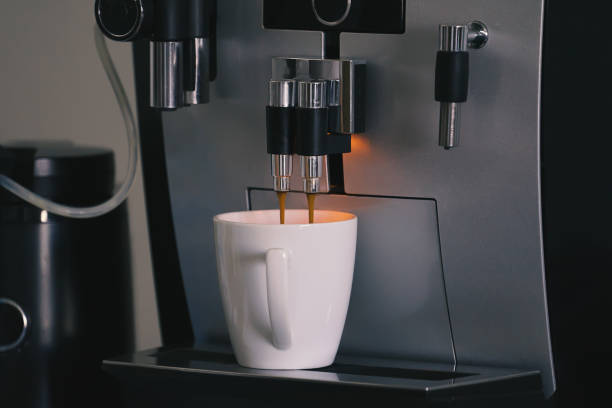
If you’re like most people, you’ve had a Keurig machine for some time now. You know how it works – pour in some K-cups, hit “brew,” and voila! Coffee! But did you ever wonder why your Keurig machine might be brewing very little coffee? Or worse, why it might be brewing no coffee at all?

A slow drip Keurigs doesn’t drip nearly as much coffee as you’d think. In fact, many Keurigs barely even drip at all. This is because the amount of coffee being brewed depends on the size of the container holding the grounds. When the container isn’t big enough, the grounds won’t completely fill up the space inside the cup. And since the amount of coffee needed to make a full pot varies depending on the strength of the brew, the Keurig won’t necessarily produce enough coffee to fill your mug.

So What Causes Slow Drip Problems?
There are several reasons why your Keurig might be producing a slow drip. First, let’s talk about the water supply. Some Keurigs use bottled water. Others use tap water. Bottled water tends to be less consistent than tap water, so it’s possible that your Keurig is having trouble dispensing just the right amount of water.
Another possibility is that your water pressure is too low. Many Keurigs come with a pressure regulator built into the unit itself. These regulators work by forcing water out of the faucet at high pressure, which helps push the water through the system. However, if your pressure is too low, the pressure regulator will actually restrict the flow of water. As a result, the water will take longer to reach the desired temperature.
Finally, there’s the issue of the Keurig’s internal components. Most Keurigs include a thermometer and a thermostat. These devices help regulate the temperature of the water coming out of the faucets. If either component malfunctions, the Keurig will struggle to maintain the correct temperature.
Why is my Keurig only giving me half a cup?
Keurigs have two different size cups: full size and mini. If you are using a single cup, it won’t matter which one you choose because both will give you the same amount of brewed coffee. However, if you want to make multiple cups, you need to know how much coffee each cup holds. To do this, simply look at the needle inside the brewer.

When your Keurig isn’t brewing the selected cup size—which might happen if you put too many grounds into the reservoir or if there aren’t enough grounds left in the hopper—the needle moves down toward the bottom of the scale. This indicates that less coffee is being extracted. You can fix this problem by adding more grounds to the reservoir or by cleaning out the hopper.
To clean out the hopper, follow these steps:
- 1. Remove the lid and place the Keurig under running hot tap water.
- 2. Let the water run over the entire surface of the hopper.
- 3. Once the water runs clear, drain the water and replace the lid.
- 4. Wait 10 seconds and repeat step
How to fix my Keurig not dispensing water
Keurigs are great machines, but sometimes they go haywire. You know what I’m talking about: When you turn it on, there’s no water coming out. Or maybe the coffee isn’t brewing. Maybe the filter doesn’t work. Whatever the problem, it’s frustrating. The good news is that most problems with Keurigs are easy fixes. Here’s how to fix yours.

- 1. Make sure the water tank is full. If it’s low, the machine won’t dispense water. Fill up the reservoir and try again.
- 2. Check the filters. Are they dirty? Clean them. They’re cheap, so make sure you do it regularly.
- 3. Try another cup. Sometimes one cup of coffee is too much for the machine. Switch cups and see if that helps.
- 4. Look inside the brewer. Is something stuck in there? Remove it and try again.
- 5. Turn off the power. This step is optional, but it’s worth trying. If the problem persists, shut down the unit and take it apart. Then check each part for damage.
Keurigs are known for being easy to use, but there are some things you might want to know about them before you start brewing coffee.
The most important thing to remember is that you don’t want to keep the machine plugged into the wall all day long. This could lead to overheating and damage to the unit. If you’re worried about having to unplug it every morning, consider buying one of those battery packs. They’ll allow you to brew while you sleep without worrying about waking up to a dead machine.

Another problem you might run into is that the machine uses a lot of energy. You’ll find that out once you plug it in, but if you go over the recommended amount of time, you could end up paying a hefty electric bill.
If you’ve been using your Keurig for a few months now, you might notice that the water reservoir isn’t full anymore. To fix this, you’ll need to empty the reservoir completely. There are several ways to do this, including pouring the contents down the drain. Once the reservoir is empty, refill it with cold water and let the machine heat it up again.
You’ll probably want to clean the K-Cup filter regularly. When you do, make sure you rinse it thoroughly. Don’t just dump hot water onto it. Instead, pour boiling water over it and let it sit for 30 seconds. Then, take it off the machine and wipe it dry.
Why Does My Keurig Barely Drip?
Keurigs are great because you don’t have to worry about wasting coffee grounds. But sometimes they just won’t work properly. If you’re having issues with your Keurig, check out our guide to fixing common problems.
Why Does My Keurig Barely Drip?
Keurigs aren’t cheap. If you’re buying one because you think it’ll save you some cash, it might cost you a little more than expected. There are a few reasons why your K-Cup pod won’t drip like it used to. Here are some common problems and what to do about them.
1. Your filter is clogged.
If you’ve had your Keurig for a while, chances are you probably haven’t cleaned out the filters regularly. This causes buildup inside the machine, which prevents water from flowing into the brewer. You can usually tell if this is the problem by looking at the bottom of the unit; if it looks dirty, take it apart and give it a good cleaning.
2. You didn’t wash the pods thoroughly enough.
You want to make sure that you rinse off the pod well before putting it into the machine. Some manufacturers recommend rinsing twice, once before and once after brewing. Others say you only need to rinse once. Either way, make sure you use hot water, and let it sit for at least five minutes.
3. You’re brewing too much coffee.
The amount of coffee you put into your machine depends on the size of your mug. For example, a 12-ounce mug holds 8 ounces of liquid. So if you fill a 10-cup pot with 5 cups of coffee, you’ll actually brew 4½ cups of coffee. When you brew less than the recommended amount, you risk overbrewing the coffee, which can cause bitterness and burnt flavors. To avoid this, measure the amount of coffee needed per cup, and adjust accordingly.
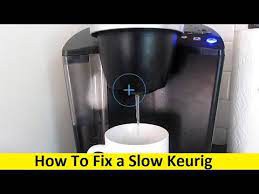
How do you fix a slow dripping Keurig?
If you are having trouble brewing enough coffee for your family, it might be because there is something wrong with your Keurig. If you are getting too little coffee, you might want to check your filters and make sure they aren’t clogging up. You might even want to change your water source. But if you’re still having issues, you’ll probably need to call a professional.
Descaling your keurig
Keurigs are great machines. They brew coffee faster than you can say “Coffee!” But like most things, there are some maintenance tasks that you must perform regularly to keep your machine running smoothly. One such task is cleaning out the water tank. If you don’t do this, your machine could overheat and shut down. So what does one do when the water level gets low? You call your local repairman, of course. But wait…if you’re lucky enough to live near a Starbucks, you might just ask for a cup of coffee while you wait. And that’s where we come in. We’ve got tips on how to clean your Keurigs without having to pay someone else to do it.
How to fix your slowly dripping Keurig?
Keurigs are great machines, but sometimes they don’t work quite right. You might find yourself having trouble making enough coffee, or even worse, leaking. If that happens, there are some steps you can take to make sure your Keurig works correctly again.
Repair for a Keurig that won’t put out water
To fix a clogged coffee machine, remove the filter basket, pour hot water into the bottom chamber, and wait for it to fill up. Let the water run through the machine for about ten seconds before filling the reservoir again. If you still don’t see water coming out of the spout, try pouring boiling water directly into the reservoir. This could cause damage to the heating element, though, so proceed carefully.
If you’re still having trouble getting water out of your coffeemaker, check whether there are air bubbles in the brewing unit. Remove the lid and look at the screen. You’ll probably find some small holes where the water goes in; those are the culprits. Try cleaning the screen and replacing the filter.
Thus, Coffee makers require regular cleaning and maintenance. If you don’t clean it regularly, it will become dirty and could cause harm to your health. You must know how to properly clean a coffee maker and use the best method to maintain it.
There are many types of coffee makers; you just need to choose one according to your needs. Some coffee makers work well with different types of coffee beans while others are suitable for espresso and drip coffee. You can find a variety of coffee makers online. However, you need to make sure that you buy the best quality coffee maker because cheap ones won’t serve your purpose.
You need to consider several factors such as the size, capacity, design, material used, features included, price, warranty, etc. Before buying a coffee maker, you must check whether it suits your home décor or not. Also, you need to consider the space where you want to place the coffee maker.
The most important thing is to choose the right model according to your requirements and budget.
Keurig is a brand name for coffee makers that brews single servings of coffee from pods. It was invented by Dr. Peter Schlumbohm in 1977. In the early 1980s, he began selling his invention under the name K-Cup. He sold the company to R. J. Reynolds Tobacco Company in 1996. In 2004, Green Mountain Coffee Roasters bought the rights to the brand.
The first model I had was an old-school one with two buttons: on and off. The problem with this design is that you have no control over how much water goes into your cup. You can only choose between hot or cold. If you want more than just black coffee, then you need to buy another machine. This is why most people use their machines for making tea instead of coffee.
There are times when your Keurig stops functioning properly and it does not drip, you might have no idea what to do in such situations and today I am going to address this issue.
Why Does My Keurig Barely Drip?
If you find yourself wondering “why my Keurig barely drips”, there could be several reasons behind it. Some common ones include:
1) Your pod has been used too many times.
2) There is something wrong with your machine.
3) Your filter needs cleaning.
4) Your machine is out of warranty.
5) Your machine is broken.
6) Your machine is leaking.
7) Your machine is clogged up.
The excess scale has most likely grown up inside the water pipes of a Keurig that barely drips or doesn’t discharge the right amount of coffee. The exit needle, on the other hand, might be clogged. Cleaning the exit needle and doing a Keurig descale typically solve these problems.
I can’t think of anything more aggravating in the morning than having to wait an eternity for a single cup of coffee to brew. After all, the whole point of buying a Keurig is to have a cup of hot, excellent coffee quickly. So, if you’ve ever wondered why my Keurig just drips a little bit and how to fix it, keep reading!
How do you fix a slow dripping Keurig?
First things first, make sure that your machine isn’t defective. Check whether the power cord is plugged incorrectly. Also, check whether the outlet works fine.
Make sure that the unit’s temperature setting is set at 200 degrees Fahrenheit. Next, try unplugging everything else connected to the same electrical socket as your Keurig. Then plug them back again. Finally, turn off the breaker switch located near the wall socket. Now, let’s get started fixing your Keurig.
Slow pouring coffee is used for two purposes.
- A blocked water pipe is one instance.
- A blocked puncture needle is the other.
In the first case, you will have to descale your Keurig, and let’s quickly have a look at how to do that.
Descaling your keurig
To keep a coffee maker working for a longer period of time, it must be carefully maintained, regardless of the brand. If you haven’t descaled your coffee maker in a while, this might be the source of your Keurig’s inability to function.
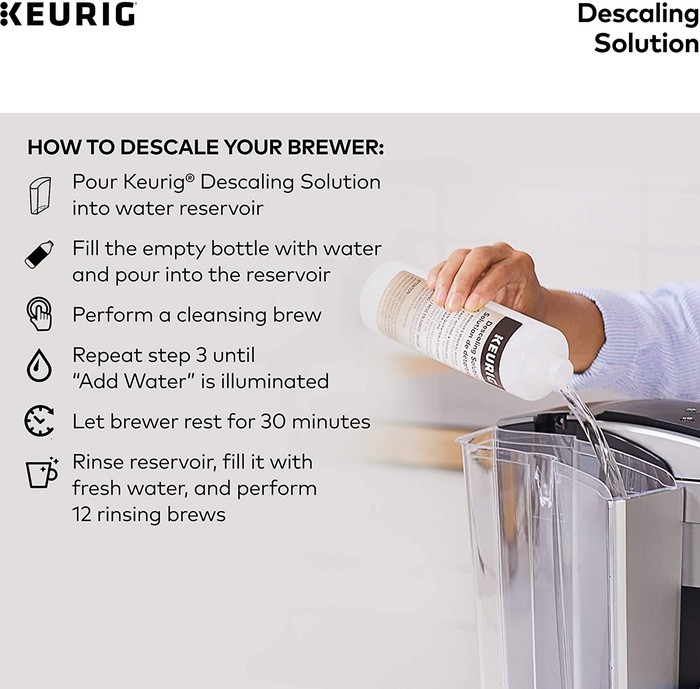
Descaling is a necessary and useful preventative maintenance operation that should be carried out on a regular basis. It assists in the elimination of any wastes and impurities that the water has left behind. Depending on how much coffee you prepare, Keurig recommends descaling your coffee maker every three to six months.
The following things are required.
- This is not a plastic cup, but rather a huge ceramic container.
- Contaminated-free drinking water
- Descaling solution from Keurig
- Being able to use the sink
STEP 1:
To switch off your Keurig, press the power button. Fill the empty reservoir with the whole bottle of Keurig descaling solution. Fill the reservoir with the water from the empty bottle. Start the brewer, place your cup on the drip tray, and wait for it to brew for a few minutes. Choose the brew pot with the greatest capacity as well as hot water.
STEP 2:
Continue to brew until the add water indicator lights up. There are no more pods to be used! If your Keurig has it, turn off the "Auto Off" feature. Allow at least 30 minutes after turning on your Keurig. Then drain and rinse whatever’s left in the reservoir thoroughly.
STEP 3
Fill the reservoir with clean water until the MAX fill line is reached. Place your cup on the drip tray and brew with the biggest brew size (no pods!) available. Remove all of the contents of the container and rinse it at least twelve times with the biggest brew size. You’ll need to refill the reservoir while you’re doing this.
How to clean Keurig needles
These are the steps you will have to carefully follow:
- Make sure the machine doesn’t have any K-cups in it.
- Turn the machine off and disconnect it.
- Remove the reservoir of water.
- Pull the pack holder away from the brewer with a gentle tug.
- To detach the pack holder from the housing, push the buttons on both sides once the pack holder is removed.
- To uncover the bottom exit needle, pull the lever on the pack holder.
- Turn the pack holder over while holding the lever down.
- To clear any blockages, insert a straightened paperclip through the exit needle.
- Reassemble the pack holder and housing by thoroughly rinsing it with water.
- After that, clean the needles at the top of the entry and exit.
- Look below the top by opening the handle. Two needles will be seen.
- Clean both holes with the paperclip.
- It’s fine to slightly tilt the brewer to get a better perspective. Just be careful not to over-tilt the machine because there is still water inside.
- Insert a straightened paperclip into the exit needle to remove any obstructions.
- After carefully washing the pack holder and housing, reassemble it.
- Clean the needles at the top and bottom of the entry and exit.
- By opening the handle, you can see underneath the top. There will be two needles visible.
- With the paperclip, clean both holes.
- It’s acceptable to tilt the brewer slightly to obtain a better view. Just keep in mind that there is still water within the machine, so don’t over-tilt it.
Why does Keurig coffee taste bad?
Because Keurig coffee makers utilize pre-ground coffee rather than freshly roasted beans, they are more expensive. This implies that every time you buy a fresh pack of K-Cups, you’re buying a product that’s previously expired. Because most of us don’t grind our own coffee at home, this might result in a significant amount of money being squandered over time.
Try grinding your own beans with a manual grinder if you want coffee that tastes fresh. You’ll receive better outcomes since you have complete control over the ingredients used to make your coffee. Plus, you won’t waste any coffee because you didn’t measure out enough grounds.
If you still want to buy pre-ground coffee, whole bean coffees rather than espresso mixes are a good option. Whole bean coffees have less caffeine than their blended counterparts, but they have a more complex flavor profile.
Conclusion
Keurigs aren’t as easy to use as other brewers like Nespresso or even traditional coffee machines.
However, they offer an excellent alternative for those who prefer convenience over quality. If you find yourself struggling to enjoy your morning cup of joe, consider switching to one of these devices instead. They may just help you start your day right! I hope this article helped you with whatever you were looking for.

It's knowing what you're doing and having a good basic foundation.
That's why my mission is to teach you the fundamentals of great cooking...
So you can start creating delicious dishes without any rules or restrictions whatsoever.
With my step-by-step instructions, my unique insider secrets and techniques,
You'll be able to easily take ordinary food and make it extraordinary!
- How to Prolong the Life of Your Kitchen Appliances - December 22, 2024
- How Long does Yogurt Take to Freeze - May 5, 2023
- Top 10 best restaurants in Montana - May 1, 2023