Last Updated on May 13, 2022
Have you ever had trouble resetting your Keurig coffee maker after using it? If yes, then you probably already know that the machine has a built-in feature called “scaling” that helps prevent over-extraction of coffee grounds. This is especially useful if you want to brew multiple cups at once.
The problem is that sometimes, even though you have scaled the machine correctly, the light keeps blinking. What does this mean? Well, it means that the machine isn’t working properly.
This is because the machine has reached its maximum capacity. In order to fix this issue, you should simply remove the filter from the machine and replace it with a new one.
What is a descale light?
The Keurig Kold brewer has two lights: One for water quality and another for descaling. If either of these lights turns on, then there is something wrong with the unit. You should contact customer service immediately.

Keurig Coffee Maker Descale Not Working?
If you see this message, then the problem lies within the descaler itself. There could be a number of reasons as to why the descaler isn’t working properly. Here are some possible causes:
1) Water Quality Problem – Your tap water might contain minerals or other substances that can cause problems with the descaling process. In such cases, you would need to get fresh water from somewhere else.
2) Too Much Salt Content – Some areas around the world have high levels of salt content in their drinking water. These salts build up over time and eventually lead to mineral deposits inside the descaler. When this happens, the descaler becomes less effective. To fix this issue, you would need to remove all salt from your home.
3) Dirty Descaling Solution – Over time, the solution used by the descaler gets dirty. As a result, the cleaning mechanism stops functioning correctly. Therefore, you would need to clean the solution regularly.
4) Faulty Parts – Sometimes, parts wear out after prolonged usage. For example, the motor that drives the descalers’ blades wears down over time. Once this occurs, the descaler doesn’t work anymore.
5) Other Problems – Apart from the above issues, there are also other things that can go wrong with the descaler. However, fixing them requires professional help.
How to reset Keurig descale light?
To resolve the problem, follow these steps:
Step 1 – Turn off the power supply to the entire house. Then unplug the device completely.
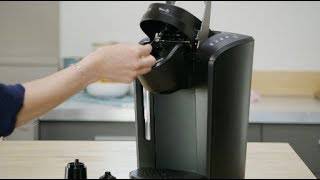
Step 2 – Remove the lid of the keurig coffeemaker. Now take out the filter basket.
Step 3 – Take out the top part of the keurig coffee maker. After removing the cover, pull out the bottom tray.
Step 4 – Unscrew the screws holding the descaler assembly together. Pull apart the descaler assembly carefully so that no pieces fall away.
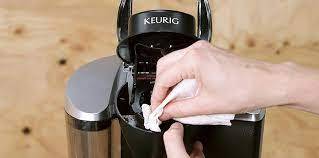
Step 5 – Clean the descaler using warm water and dish soap. Make sure that the descaler is cleaned thoroughly. Also make sure that the descaler does not touch anything while being washed.
Step 6 – Put everything back together again. Screw the descaler assembly back onto the keurig coffee machine. Plug the device back in.
Why does the descale light come up?
The descale light’s sole purpose is to indicate or inform you that your coffee maker is filthy and requires cleaning.
When water runs through the machine, a phenomenon called as scaling occurs. This occurs when tiny calcium particles and other sediments build in the inner workings of your coffee maker’s mechanism. The descaling light will turn on automatically if something like this happens. In a nutshell, your machine now need cleaning. If the machine becomes extremely filthy, it may stop operating.
How can you fix your Keurig’s descaling light problem?
The hardness of your water is the most likely cause of scaling. I would suggest using gentler water in your Keurig machine. If you have hard water, you may need to get your machine scaled on a regular basis. Filtered water makes a mess and lights up the room.
The descaling light in your Keurig is turned on for a specific and apparent purpose. You may descale the machine by using a chemical called Dezcal. You may also add vinegar to speed up and improve the procedure. Inside the machine, pour the Dezcal and vinegar combination. The descale light will turn off as a result of this.
After a few months, you’ll need to apply the descaling solution to keep your computer in good working order. You will want the descaling solution for this.
In easy stages, learn how to clean the equipment.
- Remove the water filter from your Keurig and empty it. Then switch off the machine.
- Fill the machine with the descale solution.
- Fill a bottle halfway with water and place it in the reservoir.
- Simply turn the machine on and place a cup underneath it.
- Pour the contents of the bowl into the sink.
- The procedure is repeated, this time with the addition of water and the illumination of the light
- Set the timer for 30 minutes on the brewer.
- Ensure that the reservoir is well rinsed.
- Repeat these procedures 10-12 times to thoroughly clean it.
How to descale a Keurig?
To keep a coffee maker working for a longer period of time, it must be carefully maintained, regardless of the brand. If you haven’t descaled your coffee maker in a while, this might be the source of your Keurig’s inability to function.

Descaling is a necessary and useful preventative maintenance operation that should be carried out on a regular basis. It assists in the elimination of any wastes and impurities that the water has left behind. Depending on how much coffee you prepare, Keurig recommends descaleing your coffee maker every three to six months.
If you are not sure whether you need to descale your Keurig, here are some signs that it needs to be cleaned:
The following things are required.
- This is not a plastic cup, but rather a huge ceramic container.
- Contaminated-free drinking water
- Descaling solution from Keurig
- Being able to use the sink
The descaling procedure might take up to 45 minutes. Make sure there are no pods in the machine. Remove all of the contents from the reservoir and clean it. If you have a Keurig water filter, remove it and put it away.
STEP ONE
To switch off your Keurig, press the power button. Fill the empty reservoir with the whole bottle of Keurig descaling solution. Fill the reservoir with the water from the empty bottle. Start the brewer, place your cup on the drip tray, and wait for it to brew for a few minutes. Choose the brew pot with the greatest capacity as well as hot water.
STEP TWO
Continue to brew until the water indicator lights. There are no more pods to be used! If your Keurig has it, turn off the "Auto Off" feature. Allow at least 30 minutes after turning on your Keurig. Then drain and rinse whatever’s left in the reservoir thoroughly.
STEP THREE
Fill the reservoir with clean water until the MAX fill line is reached. Place your cup on the drip tray and brew with the biggest brew size (no pods!) available. Remove all of the contents of the container and rinse it at least twelve times with the biggest brew size. You’ll need to refill the reservoir while you’re doing this.
When your coffee maker stops operating or has issues, it is usually because it is unclean and has to be cleaned.
Keurig coffee makers are designed to brew a single cup of coffee at a time. It is a popular choice among consumers because it is easy to use and does not require any special skills to operate.
However, it is important to note that the coffee maker is only capable of brewing a single cup at a time. This means that if you want to enjoy several cups of coffee throughout the day, you will have to buy several different it difficult to serve multiple people at a time.
You’ll need coffee every morning if you’re a coffee drinker. Having a coffee maker with you will be a treat, which is why many coffee lovers buy one so that they may drink their favourite coffee at any time of day. A coffee maker aids in the preparation of the hottest and most delectable cup of coffee. The Keurig coffee machine is a must-have when it comes to coffee makers. It is one of the market’s leading firms, having produced numerous attractive items that people like.
There’s nothing worse than wanting coffee and seeing your Keurig’s descale light come on. Even a standard descaling may not be enough to turn off the light. So I looked into what to do if your Keurig coffee machine won’t descale.
What is a descale light?
The Keurig Kold brewer has two lights: One for water quality and another for descaling. If either of these lights turns on, then there is something wrong with the unit. You should contact customer service immediately.
Keurig Coffee Maker Descale Not Working?
If you see this message, then the problem lies within the descaler itself. There could be a number of reasons as to why the descaler isn’t working properly. Here are some possible causes:

1) Water Quality Problem – Your tap water might contain minerals or other substances that can cause problems with the descaling process. In such cases, you would need to get fresh water from somewhere else.
2) Too Much Salt Content – Some areas around the world have high levels of salt content in their drinking water. These salts build up over time and eventually lead to mineral deposits inside the descaler. When this happens, the descaler becomes less effective. To fix this issue, you would need to remove all salt from your home.
3) Dirty Descaling Solution – Over time, the solution used by the descaler gets dirty. As a result, the cleaning mechanism stops functioning correctly. Therefore, you would need to clean the solution regularly.
4) Faulty Parts – Sometimes, parts wear out after prolonged usage. For example, the motor that drives the descalers’ blades wears down over time. Once this occurs, the descaler doesn’t work anymore.
5) Other Problems – Apart from the above issues, there are also other things that can go wrong with the descaler. However, fixing them requires professional help.
How to reset Keurig descale light?
To resolve the problem, follow these steps:
Step 1 – Turn off the power supply to the entire house. Then unplug the device completely.
Step 2 – Remove the lid of the keurig coffeemaker. Now take out the filter basket.
Step 3 – Take out the top part of the keurig coffee maker. After removing the cover, pull out the bottom tray.
Step 4 – Unscrew the screws holding the descaler assembly together. Pull apart the descaler assembly carefully so that no pieces fall away.
Step 5 – Clean the descaler using warm water and dish soap. Make sure that the descaler is cleaned thoroughly. Also make sure that the descaler does not touch anything while being washed.
Step 6 – Put everything back together again. Screw the descaler assembly back onto the keurig coffee machine. Plug the device back in.
Why does the descale light come up?
The descale light’s sole purpose is to indicate or inform you that your coffee maker is filthy and requires cleaning.
When water runs through the machine, a phenomenon called as scaling occurs. This occurs when tiny calcium particles and other sediments build in the inner workings of your coffee maker’s mechanism. The descaling light will turn on automatically if something like this happens. In a nutshell, your machine now need cleaning. If the machine becomes extremely filthy, it may stop operating.
How can you fix your Keurig’s descaling light problem?
The hardness of your water is the most likely cause of scaling. I would suggest using gentler water in your Keurig machine. If you have hard water, you may need to get your machine scaled on a regular basis. Filtered water makes a mess and lights up the room.
The descaling light in your Keurig is turned on for a specific and apparent purpose. You may descale the machine by using a chemical called Dezcal. You may also add vinegar to speed up and improve the procedure. Inside the machine, pour the Dezcal and vinegar combination. The descale light will turn off as a result of this.
After a few months, you’ll need to apply the descaling solution to keep your computer in good working order. You will want the descaling solution for this.
In easy stages, learn how to clean the equipment.
- Remove the water filter from your Keurig and empty it. Then switch off the machine.
- Fill the machine with the descale solution.
- Fill a bottle halfway with water and place it in the reservoir.
- Simply turn the machine on and place a cup underneath it.
- Pour the contents of the bowl into the sink.
- The procedure is repeated, this time with the addition of water and the illumination of the light
- Set the timer for 30 minutes on the brewer.
- Ensure that the reservoir is well rinsed.
- Repeat these procedures 10-12 times to thoroughly clean it.
How to descale a Keurig?
To keep a coffee maker working for a longer period of time, it must be carefully maintained, regardless of the brand. If you haven’t descaled your coffee maker in a while, this might be the source of your Keurig’s inability to function.
Descaling is a necessary and useful preventative maintenance operation that should be carried out on a regular basis. It assists in the elimination of any wastes and impurities that the water has left behind. Depending on how much coffee you prepare, Keurig recommends descaleing your coffee maker every three to six months.
The following things are required.
- This is not a plastic cup, but rather a huge ceramic container.
- Contaminated-free drinking water
- Descaling solution from Keurig
- Being able to use the sink
The descaling procedure might take up to 45 minutes. Make sure there are no pods in the machine. Remove all of the contents from the reservoir and clean it. If you have a Keurig water filter, remove it and put it away.
STEP ONE
To switch off your Keurig, press the power button. Fill the empty reservoir with the whole bottle of Keurig descaling solution. Fill the reservoir with the water from the empty bottle. Start the brewer, place your cup on the drip tray, and wait for it to brew for a few minutes. Choose the brew pot with the greatest capacity as well as hot water.
STEP TWO
Continue to brew until the water indicator lights. There are no more pods to be used! If your Keurig has it, turn off the "Auto Off" feature. Allow at least 30 minutes after turning on your Keurig. Then drain and rinse whatever’s left in the reservoir thoroughly.
STEP THREE
Fill the reservoir with clean water until the MAX fill line is reached. Place your cup on the drip tray and brew with the biggest brew size (no pods!) available. Remove all of the contents of the container and rinse it at least twelve times with the biggest brew size. You’ll need to refill the reservoir while you’re doing this.
When your coffee maker stops operating or has issues, it is usually because it is unclean and has to be cleaned.
Conclusion
This is how you can fix a Keurig Descale light and reset it.

It's knowing what you're doing and having a good basic foundation.
That's why my mission is to teach you the fundamentals of great cooking...
So you can start creating delicious dishes without any rules or restrictions whatsoever.
With my step-by-step instructions, my unique insider secrets and techniques,
You'll be able to easily take ordinary food and make it extraordinary!
- How to Prolong the Life of Your Kitchen Appliances - December 22, 2024
- How Long does Yogurt Take to Freeze - May 5, 2023
- Top 10 best restaurants in Montana - May 1, 2023
I have a K-Supreme Plus and I cannot find how to reset the descale light for this machine.