Last Updated on November 8, 2022
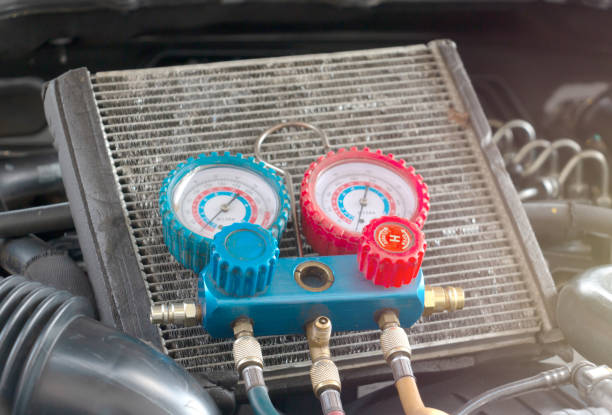
When you hear about leaking refrigerator compressors, it makes sense that the most common problem is the compressor itself. But what happens if the leak isn’t coming from the compressor? What are some other possible causes of a leaking refrigerator? And how do you fix a leaky refrigerator?

The first thing to know about a leaking refrigerator is that it shouldn’t happen very often. Most modern refrigerators use a sealed compressor that prevents air from entering the compressor unit. This keeps out dust and dirt that might damage the compressor. However, if the compressor does become damaged, it’s possible that small amounts of water could find their way inside. Water vapor is heavier than air, so it tends to collect near the bottom of the fridge. The water won’t freeze and expand as long as the humidity level stays low enough. It’ll usually just drip onto the floor and evaporate away.
So why would the water come into contact with the compressor? There are several possibilities. First, the compressor may have been damaged during shipping and assembly. Second, the seals around the compressor may have failed due to age or wear. Third, the compressor may have developed a crack in one of the fins.
If the compressor is still working fine, another possibility is that the condenser fan is failing. Condensers are located outside the freezer compartment and work together with the compressor to cool the refrigerant. If the condenser fan fails, warm air circulates throughout the entire fridge. This could lead to increased humidity levels and, eventually, a leaky compressor.
Another reason that a refrigerator might leak is because of a faulty thermostat. Thermostats regulate the temperature in the freezer and refrigerator compartments. They’re typically mounted on the wall above the door handles. If the thermostat is defective, it could send false signals indicating that the refrigerator needs to run longer than necessary. This can lead to excessive energy usage and eventual leakage.
Finally, there’s always the chance that the wiring harness has corroded or broken. Wiring harnesses connect the components of the refrigerator to the power source. If the wires break, the refrigerator may no longer receive electricity and start running without warning.
How Do You Fix a Leaky Fridge?
1. Frozen Defrost Drain
The iRobot Roomba 980 robot vacuum cleaner is designed to clean floors while you sleep. This model includes a built-in sensor that detects objects up to 2 inches tall and alerts you via an LED light. To make it easier to see where the robot is cleaning, the floor mat features three LEDs that indicate the direction the robot is moving. You can control the speed of the robot with the included remote control. If you want to use the remote to turn off the robot, simply press and hold down the power button located near the top of the unit.
This model uses the new “Frozen Defrost” technology, allowing the robot to operate without melting ice during winter. Simply place the robot on a flat surface and let it run overnight. When finished, just lift the lid, and the robot will automatically shut itself off.
You can also set the robot to perform scheduled tasks such as vacuuming every night or weekly, emptying the dust bin once weekly, and scheduling cleaning cycles based on room temperature. For example, if the room gets too cold, the robot will stop cleaning until the next day.
To prevent the robot from getting stuck under furniture, the front wheels are locked into position and cannot move sideways or backward. However, the rear wheels can rotate 360 degrees, allowing the robot to navigate around obstacles.
For added convenience, the robot has a removable charging base that stores the battery charger and AC adapter. The base fits most standard outlets and can be easily removed when not needed.
If you’re looking for a powerful robot vacuum cleaner, look no further than the iRobot Roombas. These units feature high-quality construction and intelligent design. They offer outstanding performance and long-lasting batteries, making them perfect for homes with pets and kids. With the iRobot Room 980, you’ll never worry about having to replace expensive parts again.
2. Clogged Defrost Drain
The defroster drains are located under the dash. Plastic caps cover them. Remove the cap and clean out the drain tube. If there is no clog, you don’t need to do anything else. Using a small brush to clear away debris is plugged up. You might want to add some lubricant to help keep things moving smoothly.
3. Issues with the Water Filter Head
If you want to replace your water filter, check the housing condition before doing so. If it appears worn out, replace it immediately. A leaky filter can cause severe damage to plumbing fixtures and appliances downstream. You don’t want to find yourself without running hot water because you didn’t notice a problem with your water filtration system.
The best way to determine whether or not your water filter needs replacement is to look inside the housing. You’ll know what you’re dealing with if there are signs of corrosion, leaks, or mold growth. However, if the housing looks fine, you might want to consider changing the filter anyway.
There are several different types of filters used today. Each type has its advantages and disadvantages. For example, ceramic filters provide excellent performance but tend to clog quickly. On the other hand, carbon block filters offer better flow rates but require frequent cleaning.
You can use the following guidelines to help decide which type of filter is right for you.
Ceramic Filters – Ceramic filters are designed to trap particulates such as sediment and chlorine. They are typically installed in kitchen faucet systems.
Carbon Block Filters – Carbon block filters trap bacteria and viruses. These filters are commonly found in bathroom faucets.
Aquarium Filters – Aquarium filters are specifically designed to keep aquarium water clean and clear. These filters are often placed directly into fish tanks.
How to replace your Uline Refrigerator Water Filter Head and Housing?
The Uline refrigerator water filter head and housing need replacement every six months, depending on how much use it gets. You’ll want to replace it immediately if you notice any signs of damage, such as cracks or leaking around the edges. Otherwise, you’re likely fine for another few months.
To do this, follow the steps outlined here. You’ll start by unscrewing the old filter from the base of the fridge. Then, take off the plastic cover that holds the filter in place. Finally, lift up the metal plate that covers the drain hole.
Next, carefully pull the old filter away from the base. Be careful not to drop it or break it. Once removed, put it aside for later disposal.
Now, take the new filter and install it in the same spot where the old one used to go. Put some lubricant on the threads to make the job easier. Next, screw the filter into place. Then, attach the plastic cover and the metal plate.
Finally, turn the water supply valve back on and let everything cool down again. You can reattach the plastic cover and tighten the screws when you’re done.
Issues with the Water Filter
The water filters are designed to protect the engine from contaminants in the water supply. They usually include a pre-filter that removes large particles like sand, rust, etc. and a carbon filter that absorbs harmful chemicals such as chlorine and chloramines. There are three different types of water filters:
1. Carbon Block Filters – These are the most common type of water filter used today. They consist of a block of activated charcoal held together with metal mesh. This charcoal acts as a catalyst for the chemical reaction taking place inside the engine.
2. Electrolytic Filters – These are similar to carbon block filters except that the active material is placed in a separate chamber rather than embedded within the filter itself. This allows the entire surface area of the filter to be exposed to the water flow. As a result, electrolytic filters provide better filtration performance compared to carbon block filters.
3. Ion Exchange Resins – These are similar to carbon block filters in design but use ion exchange resins instead of activated charcoal. Ion exchange resin-based water filters produce less sediment buildup than carbon block filters because no catalytic action is involved in the process. However, the main disadvantage of ion exchange resin-based water filters is that they tend to clog up faster than carbon block filters.
4. Pressure Feed System – A pressure feed system uses a pump to force the water into the filter media. This ensures that the entire volume of the water passes through the filter media. This type of water filter requires regular maintenance to ensure that it does not become ineffective over time.
5. Automatic Shut-Off Valve – An automatic shut-off valve automatically shuts down the water supply once the tank becomes full. This helps prevent damage caused by excessive pressure buildup in the tank.
6. Filtration Rate – How fast the water flows through the filter depends upon the size of the holes in the filter media. Smaller hole sizes allow the water to pass through quickly, whereas larger hole sizes slow down the flow of water.
Issues with the Water Inlet Valve
The water filter cartridge cannot be used again once it has been replaced. If you are still experiencing issues with the water inlet valve, please contact us immediately. To ensure proper operation of the water filtration system, we recommend changing the water filter cartridge every six months. For further information, please refer to the instructions included with each water filter cartridge.
Issues with the Drain Pan
The condensing unit is responsible for cooling air inside your home. If there are issues with the drain pan, you could experience problems like mold growth, water damage, and even carbon monoxide poisoning. To avoid such cases, checking the drain pan regularly is important. Here are some tips to help you do so.
Check the drain pan every month
Check the drain pan once a month. You can use a flashlight to look into it, but ensure you don’t touch anything inside the drain pan. Remember that the drain pan must be clean because it collects wastewater.
Make sure the drain pan is installed correctly
Ensure the drain pan is firmly attached to the wall and doesn’t move around too much. Also, make sure the drain pipe isn’t blocked.
Use a vacuum cleaner
Use a vacuum cleaner to clear out debris from the drain pan. This way, you won’t have to worry about cleaning up the mess yourself.
Uline Wine Cooler Leaking Water – Solutions
The ULINE® wine cooler leaks water, causing mildew growth inside the unit. This could lead to mold formation and musty odors. You must replace the rubber seal around the drain pan to prevent this problem. If you do not replace it, water will leak into the unit and cause mildew growth.
To fix this issue, follow these steps:
1. Remove the bottom panel of the unit.
2. Unscrew the four screws near the unit’s front edge.
3. Pull out the plastic cover that covers the drain pan.
4. Disconnect the wiring harness connector.
5. Clean the drain pan.
1. Don’t Open the Wine Cooler Frequently
The average household spends about $500 per year on wine coolers. You are opening the door of the wine cooler once every six months will increase the unit’s life expectancy by up to 10 years. But you don’t want to open it too frequently because it could shorten the life span of your wine cooler.
2. Absorb the Condensation
Condensation is a common problem in wine storage areas. When humidity rises above 50%, it can cause damage to labels and bottles. To prevent condensation, you must absorb excess moisture. This is done by keeping the temperature low enough to slow down evaporation. If you are storing your wine in a refrigerator, open the door occasionally to allow air circulation. You should also consider purchasing a dehumidifier.
If you notice mold growing on your labels, immediately clean up the area and dispose of the affected items. Mold spores can quickly spread throughout a room, so take care to protect yourself and others.
3. Check the Door Seal
You probably don’t think about it much, but door seals play a critical role in keeping out pests like mice, insects, and even water. Here’s how to check them to make sure that they’re doing what they should.
#1 – Look for cracks
If you notice any cracks around the edges of the seal, it could mean that there’s moisture getting into the house. This could lead to mold growth and rot. If you see any cracks, repair them immediately.
#2 – Inspect the gasket
The rubber gaskets inside the door frame keep moisture from seeping in. You’ll want to look closely at the seams and corners where the gasket meets the wall. Make sure the gasket isn’t cracked or torn. If it is, replace it.
#3 – Check the weatherstripping
Weatherstripping helps prevent cold air from entering the home while letting warm air escape. It keeps drafts from coming in through gaps in the walls and windows. Look for signs of wear, such as tears or rips. Replace worn weatherstripping immediately.
4. Unclog the Drain Pipe
Unclogging the drain pipe is easy. Just turn the water off, pull out the plug and use a plunger to push down on the obstruction until it clears. If you don’t want to go through the trouble of unplugging the pipes, try running hot water over the area where the blockage occurs. This method works best for larger obstructions like hairballs.
A dishwasher filter will keep food particles out of your sink and prevent odors from building up. To install one, open the door and locate the drain hose. Remove the cap and place the filter into the opening. Replace the cap and tighten it securely.
Change the filter every six months to ensure proper drainage.
Conclusion – Uline Refrigerator Leaking
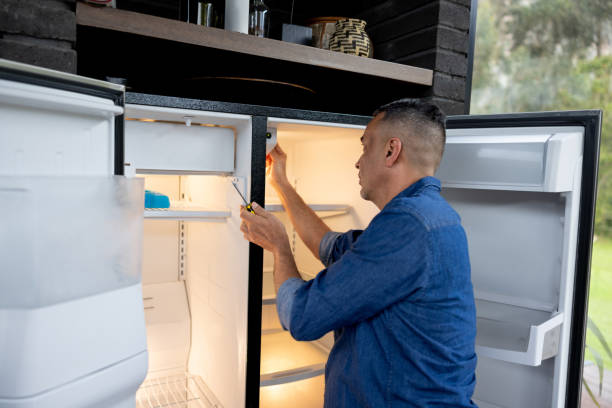
The refrigerator had been working fine for several months. Then one day it stopped making ice. I called Uline Appliance Repair Service. They sent out a technician within 24 hours. He looked under the hood and found water leaking into the freezer compartment. He replaced the evaporator coil and repaired the leak. The unit works great now.
Uline Appliances Repair Service is a good choice for appliance repairs.
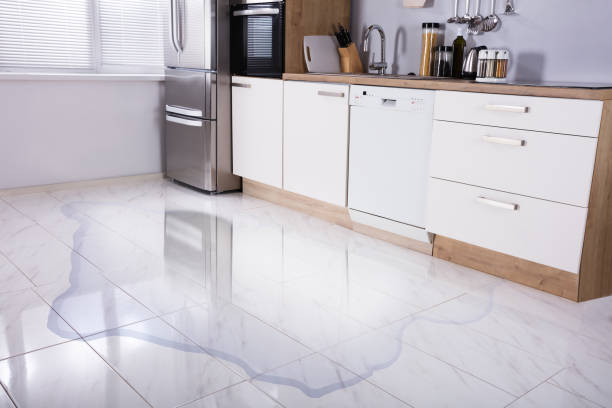
You’ve bought a new refrigerator and now you hear water dripping from the bottom.
What should you do?
If you’ve ever had a leaky fridge or freezer, then you know how annoying it can be.
The problem usually occurs because of a faulty seal around the door gaskets.
Uline has a solution for you.
A leaking refrigerator can cause serious damage to your home.
In addition, it can also be expensive to fix.
Fortunately, Uline offers a repair service for refrigerators and freezers.
They’ll send out a technician who can diagnose the issue and provide a cost estimate
Uline Refrigerator Leaking – Possible Reasons and Solutions
If you notice any leaking from your refrigerator, you should immediately contact a professional service technician. This could be a sign of serious problems that could lead to major damage to your appliance. Here are some possible reasons why your refrigerator is leaking: 1 Water leak from the compressor
1. Issues with the Defrost Drain
You should check if the drain hose is properly connected to the drain pan. It is important to ensure that the drain hose is not clogged. If the drain hose is clogged, you should clean it using a vacuum cleaner. 2. Poorly installed condenser fan motor 3. Improper installation of the evaporator coil
i. Frozen Defrost Drain
1. Check if the drain hose is correctly attached to the drain pan. Ensure that the drain hose is free from any blockage. If the drain hose becomes blocked, you should clean it with a vacuum cleaner. ii. Poorly installed condensing fan motor iii. Improper installation of evaporator coil
ii. Clogged Defrost Drain
1. Check if drain hose is correctly attached. 2. Make sure that drain hose is not clogged.
2. Issues with the Water Filter Head
1. Check if the drain hose is correctly attached to the filter head. 2. Make certain that the drain hose is not clog.
How to replace your Uline Refrigerator Water Filter Head and Housing
Step 1: Remove the old filter head from the refrigerator. Step 2: Unscrew the screws holding the filter head to the refrigerator. Step 3: Pull off the rubber gasket around the top of the filter head. Step 4: Slide the new filter head into place. Step 5: Screw the screws back into place.
3. Issues with the Water Filter
1 The water filter cartridge needs to be replaced every 6 months. 2 The water filter cartridge is not reusable.
4. Issues with the Water Inlet Valve
1 The water filter cartridge needs replacing every 6 months. It is recommended that you replace the water filter cartridge after six months of use. This will ensure that the water filter cartridge is working properly. 2 The water filter cartridge is NOT reusable.
5. Issues with the Drain Pan
6. Issues with the Drain Pans 7. Issues with the Steam Release Valve
Click Here to Buy Yours Now!
5. Issues with the Drain pan 1. The drain pan is not properly installed. It should be placed directly under the bottom of the cooker. This prevents any moisture from dripping into the oven. 2. The drain pan is dirty. Cleaning the drain pan helps prevent rust and corrosion.
Uline Wine Cooler Leaking Water – Solutions
If you notice any leaking water around the base of the unit, check the rubber gasket around the base of the door. If it appears damaged, replace it. Check the electrical connections between the base and the door. If they are loose, tighten them. Also, check the screws holding the door to the base. If they are loose or missing, replace them.
1. Don’t Open the Wine Cooler Frequently
Don’t open the wine cooler frequently. This will reduce the life span of the product. 2. Keep It Clean Answer: Keep the wine cooler clean. Use a damp cloth to wipe off dust and dirt from the exterior of the wine cooler.
2. Absorb the Condensation
Absorb the condensation. Do not let the condensation drip down onto the floor. 3. Avoid Using Chemicals Answer: Avoid using chemicals. Make sure to use only natural cleaning products.
3. Check the Door Seal
Check the door seal. It should be easy to open and close. 4. Keep the Kitchen Clean Keep the kitchen clean. Use a sponge instead of paper towels to wipe off spills.
4. Unclog the Drain Pipe
Unclog the drain pipe. Turn off the faucet and remove the stopper from the sink. Using a plunger, push down on the clogged area until the liquid drains out. Then replace the stopper. 5. Replace the Dishwasher Filter Replace the dishwasher filter. This helps prevent odors and keeps the machine running smoothly.
Uline Ice Maker Leaking – Quick Fix
If you notice any leaks around the ice maker, check the rubber gasket around the door. It could be damaged and leaking. To fix this problem, simply replace the gasket. How to Clean Your Microwave Oven 1. Remove the microwave oven from the wall.
1. Water Inlet Valve Issues
Water inlet valves are designed to prevent excessive water from entering the microwave cavity. This prevents damage to the microwave oven. However, if the water inlet valve fails, water can enter the microwave cavity and cause serious damage. How to Repair a Stovetop Burner Stovetop burners are very important appliances in every household. They help us to cook our meals easily. But sometimes these burners get stuck and we cannot turn them off. So, how to repair a stove top burner? Here are the steps to follow:
2. Low Pressure from the House Water Supply
Low pressure from the house water supply can occur because of a leaky faucet, faulty plumbing, or a damaged pipe. It could also be caused by a broken washer or defective valve. A low pressure condition can lead to a slow flow rate of water into the house. This can result in a buildup of pressure within the pipes. As a result, the water hammering noise occurs. 3. Microwave Oven Leaking Gas Microwave ovens are used to cook food quickly and efficiently. These devices are equipped with a magnetron, which generates microwave energy. The microwave radiation heats the food placed inside the oven. The heating process causes the moisture content of the food to evaporate. This results in the formation of gas bubbles. These gas bubbles expand when heated and push against the inner walls of the oven. This leads to the leaking of gas from the microwave oven.
3. Defective Ice Maker Assembly
Defective ice maker assembly can happen due to improper installation or malfunctioning of the machine. In case of malfunctioning, the ice maker does not produce any ice. The ice maker may stop working after a certain period of time. The ice maker may also get stuck while making ice. 4. Overheating of the Refrigerator Overheating of the refrigerator can occur due to several reasons. One of the main reasons is the failure of the thermostat. The thermostat controls the cooling system of the refrigerator. If the thermostat fails, the cooling system cannot work properly. This leads to overheating of the refrigerator. Another reason for overheating of the refrigerator is the presence of an open door. The open door allows hot air to enter the refrigerator. This makes the temperature rise.
Conclusion – Uline Refrigerator Leaking
1. Check the freezer compartment for leaks. Look for signs of moisture around the edges of the freezer compartment. If you see any signs of leakage, contact a professional immediately. 2. Check the compressor. Make sure that the compressor is running smoothly. If the compressor stops running, check the fuse box. Replace the fuses if necessary.
How do you fix a leaking refrigerator?
Refrigerators are designed to keep food cold. It does not mean that if you put something in the fridge, it will stay cool forever. Refrigerator leaks happen because of the condensation build up on the walls of the refrigerator. This happens because of the humidity level inside the refrigerator. Humidity levels inside the refrigerator change depending upon the weather outside. If the humidity level is low outside, then the moisture from the air gets absorbed into the refrigerator. As the temperature drops, the moisture inside the refrigerator freezes and forms ice crystals. These ice crystals get deposited on the walls of the refrigerators and form a layer of frost. Over time, these layers of frost accumulate and eventually start dripping water onto the floor.
Why is my fridge leaking water from underneath?
Refrigerators are designed to keep food cold and safe. However, if the refrigerator is not properly maintained, it could leak water. This happens because the seals around the door gaskets tend to wear down overtime. As the seals get worn down, air gets trapped between the door gasket and the frame. This allows moisture to seep into the refrigerator. It is important to maintain the refrigerator well to avoid such problems.
What causes a refrigerator to leak water on the floor?
Refrigerators leak because of two main reasons: 1 The compressor is not working properly 2 The evaporator coil is clogged. Both these problems can be solved by replacing the compressor and cleaning the evaporator coil. To replace the compressor, remove the front panel of the refrigerator and locate the compressor. Remove the screws holding the compressor in place and disconnect the wires from the compressor. Then take off the old compressor and put in the new one. Clean the evaporator coil using a vacuum cleaner. This will help clear any debris that may be blocking the air flow.

It's knowing what you're doing and having a good basic foundation.
That's why my mission is to teach you the fundamentals of great cooking...
So you can start creating delicious dishes without any rules or restrictions whatsoever.
With my step-by-step instructions, my unique insider secrets and techniques,
You'll be able to easily take ordinary food and make it extraordinary!
- How to Prolong the Life of Your Kitchen Appliances - December 22, 2024
- How Long does Yogurt Take to Freeze - May 5, 2023
- Top 10 best restaurants in Montana - May 1, 2023