Last Updated on November 8, 2022
Are you tired of cleaning ice makers every time you want to make some ice? If yes, then you’ve come to the right place. In this guide, I’ll show you how to clean an ice maker in a GE refrigerator.
GE has been manufacturing refrigerators since 1893. The company is known for its high quality appliances and customer satisfaction. This brand is also considered as one of the top five brands in the United States.
How to clean an ice maker in a GE refrigerator?
AGE refrigerators are known for their reliable performance and easy maintenance. But when it comes to cleaning them, there is more than one way to do it. To help you out we put together a short video showing how to remove the ice maker from a GE model.
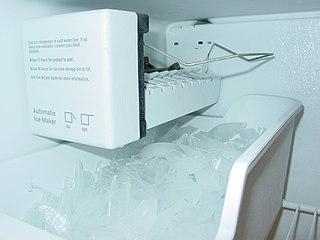
The hardest part of the job is removing the ice maker from the freezer compartment. There are two ways to do this. One is to open the door and pull it out. Then you’ll find the ice maker attached to the back panel of the fridge.
Another option is to unscrew the screws holding the ice maker in place. Once removed, simply disconnect the wires and remove the ice maker from the back of the fridge.
But if you prefer a hands-free approach, you can also remove the ice maker without opening the freezer compartment. Simply slide the drawer forward, lift the front panel and pull the ice maker out.
How do you clean the water and ice dispenser on a GE refrigerator?
If you haven’t tried cleaning an ice dispenser yourself, you’ve probably wondered how such a small device could become clogged. But when you run out of ice and there’s nothing left, you may be tempted to dump out any remaining liquid inside.
It’s important to wipe away all excess liquid because even though it looks clear, it often contains bacteria. When you pour more liquid back in after wiping it can cause future problems.
In addition, there are three main types of ice dispensers – gravity-fed (most common), vacuum-powered, and push button-operated. Each type uses a different method for removing debris.
Gravity-feed dispensers rely on falling ice chips to remove particles while vacuum-power mechanisms expel dirt and debris with a powerful suction motor. Push-button models also require periodic maintenance – simply press the button to release accumulated ice crystals.
However, a properly maintained ice maker may last 10 years or longer, depending on its usage and exposure to extreme heat or cold. To properly care for your machine, follow these tips:
• First, wash hands thoroughly with soap and warm water. If you have cuts or abrasions, make sure to cover them with bandages before washing.
• Avoid touching the entire unit with bare skin; instead, clean only the area around the spout or lever. This will minimize the spread of germs.
• Place a damp cloth or paper towel near the drain to absorb moisture.
• Clean the unit regularly and gently. Never lean against it or let children play near it.
• Rinsing the bin is optional; however, emptying it occasionally helps prevent mold buildup. If you choose to rinse the bin, wet the bottom and sides and turn the container upside down. Do not disturb the sediment while rinsing.
How do you clean mold out of a refrigerator water dispenser?
Mold can grow inside any container where there is moisture and heat. To avoid having mold growing in your home, make sure that your kitchen sink drain pipe is clear of debris and food scraps. Make sure that your garbage disposal isn’t clogged. Clogs in these areas could cause mold growth. Cleaning your fridge water dispenser regularly will help prevent mold from developing. If mold grows within the dispenser, remove it immediately. Clean the entire area thoroughly and dry completely. Use an antimicrobial cleaner (like bleach) to disinfect the outer surfaces of the dispenser. After cleaning, rinse the unit well with hot tap water. Allow the unit to air dry completely after rinsing. Don’t place the unit back together until the surface dries. If you notice water leaks when refitting the parts, call a professional plumber right away to fix them.
How to clean under glass in a GE fridge?
A great way to begin any creative writing project is to ask yourself “What am I trying to communicate?” This is perhaps the most important question that you will face when launching a campaign. If you do not have an answer to this question, you are likely doomed to fail.
But how do you define ‘cleaning’? What exactly is cleaning? Does it mean cleaning out the refrigerator, cleaning the toilet, cleaning up after the kids; whatever makes sense for your situation we’ll assume it means, cleaning.
Once you’ve defined what it is you are attempting to convey, you can now move onto developing your message. After all, there’s nothing more frustrating than having a brilliant idea and feeling stuck because you don’t know where to go with it. So, to avoid this frustration, put some time aside each day to brainstorm ideas and come up with fresh ways to make your point.
As you are thinking about what point you would like to make, consider what emotions will play a part in making that point. In order to effectively attract the right type of person, you must ensure that your copy targets the reader based upon his emotional state (or states).
The key here is to identify the emotion which feels closest to the problem you wish to solve. For example, let’s say you want to improve customer satisfaction within your company. Your best bet will be to find the emotion which is felt by customers today – dissatisfaction. Then, when you’re writing your copy, focus on presenting your product or service in such a way that improves the customer experience.
It’s very easy to jump straight into the middle of the conversation without really knowing what the buyer is going through. If you want to connect with your ideal prospect, you need to get inside their head. Ask yourself questions such as “How did my potential customer feel about the last purchase he made?” “Did he feel satisfied or disappointed?” “Why did he choose to buy from me instead of someone else?”
There are two types of questions you can ask – open-ended and closed-ended. Open-ended ones require your prospect to give you information while closed ones require him to tell you what he thinks. When asking open-ended questions, the answers may lead you to further questions. Asking these kinds of questions allows the reader to share her thoughts and feelings about the subject, therefore giving you an opportunity to develop rapport.
Are you having trouble keeping your refrigerator clean?
If so, then you should definitely check out this quick guide.
This article will explain you how to clean an ice maker in a GE refrigerator.
GE has been around since 1892, and they are known for their appliances.
They also produce refrigerators, freezers, washers, dryers, dishwashers, stoves, microwaves, and even coffeemakers.
Their refrigerators come in three sizes: mini, standard, and large.
This guide will teach you how to clean an icemaker in a GE refrigerator.
First, you’ll need to remove the ice tray from the freezer compartment.
Then, you’ll need to open the door to the freezer compartment.
Next, you’ll need to take off the cover plate.
Finally, you’ll need to wipe down the entire inside of the freezer compartment
How to Clean an Ice Maker in a GE Refrigerator – Guiding Steps
1. Remove the ice maker from the refrigerator. 2. Unplug the unit from the wall outlet.
Step 1: Gather Your Tools
To clean the ice maker, you will need a soft cloth, warm water, dish soap, and a plastic brush. Step 2: Disassemble the Unit Answer: To disassemble the ice maker, remove the screws holding the top panel on. Then remove the two side panels.
Step 2: Turn the Ice Maker Off
Turn off the power switch located near the back of the unit. Step 3: Clean the Inside of the Machine Answer: Remove any debris from the bottom of the ice maker. Use a soft cloth to wipe down the ice maker. Step 4: Reassemble the Unit Step 5: Test the Ice Maker Answer: Put the ice maker back together and test the ice maker.
Step 3: Take the Ice Bucket Out
Remove the ice bucket from the freezer. Step 4: Fill the Ice Bucket With Water Answer: Pour enough water into the ice bucket to fill it about halfway.
Step 4: Clean the Ice Bucket and Ice Maker
Wipe down the outside of the ice maker and the inside of the ice bucket using a damp cloth. Step 5: Put the Ice Bucket Back Into the Freezer Put the ice bucket back into the freezer.
Step 5: Sanitize the Ice Maker
Sanitizing the ice maker is very important because mold grows easily on the surface of the ice maker. To sanitize the ice maker, wipe down the inside of the ice maker with a clean, dry cloth. Make sure to get into every nook and cranny.
Step 6: Finish Up
After cleaning the ice maker, put away any items that were used during the cleaning process. It is recommended to store the ice maker in a cool area not cold until you are ready to use it again.
When to Clean the Ice Maker…
It is recommended to clean the ice maker after every six months of usage. This includes removing the ice from the tray and washing the ice maker. How to Clean the Ice Maker… Answer: To clean the ice maker, remove the ice trays and wash them thoroughly using warm water and soap. After washing the ice trays, rinse them well under running water. Then, dry them completely using paper towels.
Clean Under GE Refrigerator – Steps to Take
To clean the refrigerator, start by cleaning the shelves and drawers. Remove any debris or dirt from the shelves and drawers using a damp cloth. Wipe down the refrigerator door handles and other areas that get dirty easily. Use a soft brush to scrub the refrigerator coils.
Cleaning the Coils
To clean the coils, take off the front panel of the refrigerator and remove the screws holding the panel in place. Then, lift the panel away from the refrigerator. Next, spray the coils with a solution of warm water mixed with dish soap. Let the coils soak for about 15 minutes. After soaking, wipe the coils dry with a clean towel. Replace the panel and tighten the screws.
How to Clean Under Glass in a GE Fridge
To clean under glass in a GE fridge, follow these steps: Remove the top shelf of the refrigerator. Remove any ice cubes or other items that could obstruct access to the bottom shelves. Use a soft cloth to wipe down the shelves. Do not use abrasive cleaners such as scouring pads or sponges. Never use ammonia-based products.
How to Clean GE Ice Maker UNC15NJII
To remove stains from the ice maker, use a mild dishwashing liquid. Rinse thoroughly. For stubborn stains, try rubbing alcohol.
To clean the condenser fins of the ice maker:
To clean the fins of the ice maker, pour warm water into the reservoir. Let the water run until the water level drops below the top of the fins. Remove the fins and rinse under running water.
To clean the exterior of the ice maker:
Clean the outside of the ice maker using a soft brush. Make sure to remove any debris from the surface of the ice maker. Clean the interior of the ice maker using soap and hot water. Rinse well.
How to Clean GE Opal Ice Maker
To clean the exterior of the icemaker: 1. Remove the top panel of the ice maker. 2. Remove the bottom panel of the ice maker 3. Remove the front panel of the ice maker 4. Remove the back panel of the ice maker 5. Remove the side panel of the ice maker 6. Remove the door panel of the ice maker 7. Remove the cover plate 8. Remove the filter 9. Remove the drain pan 10. Remove the ice bin 11. Remove the ice tray 12. Remove the ice dispenser 13. Remove the ice storage bin 14. Remove the ice storage tray 15. Remove the ice bin 16. Remove the ice tray 17. Remove the ice bin 18. Remove the ice tray 19. Remove the ice bin 20. Remove the ice tray 21. Remove the ice bin 22. Remove the ice tray 23. Remove the ice bin 24. Remove the ice tray 25. Remove the ice bin
To sanitize the ice maker:
1. Remove the top panel 2. Remove the bottom 3. Remove the front 4. Remove the back 5. Remove the side 6. Remove the door 7. Remove the cover 8. Remove the filter 9. Remove the drain pan 10. Remove the ice bin if applicable 11. Remove the ice trays if applicable 12. Remove the ice bins if applicable 13. Remove the ice tray if applicable 14. Remove the ice bin 15. Remove the ice tray if applicable 16. Remove the ice bin 17. Remove the ice tray 18. Remove the ice bin 19. Remove the ice tray 20. Remove the ice bin 21. Remove the ice tray 22. Remove the ice bin 23. Remove the ice tray 24. Remove the ice bin 25. Remove the ice tray 26. Remove the ice bin 27. Remove the ice tray 28. Remove the ice bin 29. Remove the ice tray 30. Remove the ice bin 31. Remove the ice
How do you clean the water and ice dispenser on a GE refrigerator?
If you notice mold growing in your refrigerator water dispenser, you should immediately contact your local service provider. Mold growth in the refrigerator water dispenser can lead to serious health risks if not removed promptly. Your local service provider will be able to help you get rid of the mold safely.
How do you clean mold out of a refrigerator water dispenser?
Mold can form on the inside of a refrigerator water dispensing unit because of the moisture from condensation. It is important to remove any mold from the unit immediately. To remove the mold, turn off the refrigerator and open the door. Remove the ice tray and wipe down the interior of the unit with a damp cloth. Then rinse the unit thoroughly with warm water. After cleaning, replace the ice tray and shut the door.
How do you remove mold from a refrigerator water dispenser?
To clean the water and ice maker on a GE refrigerator, simply turn off the power switch and remove the top panel. Then, open the door and remove the water and ice dispensers. Clean the parts using warm water and soap. Replace the top panel and reattach the water and ice dispensing units. Turn the power back on and test the system.

It's knowing what you're doing and having a good basic foundation.
That's why my mission is to teach you the fundamentals of great cooking...
So you can start creating delicious dishes without any rules or restrictions whatsoever.
With my step-by-step instructions, my unique insider secrets and techniques,
You'll be able to easily take ordinary food and make it extraordinary!
- How to Prolong the Life of Your Kitchen Appliances - December 22, 2024
- How Long does Yogurt Take to Freeze - May 5, 2023
- Top 10 best restaurants in Montana - May 1, 2023