Last Updated on July 1, 2022
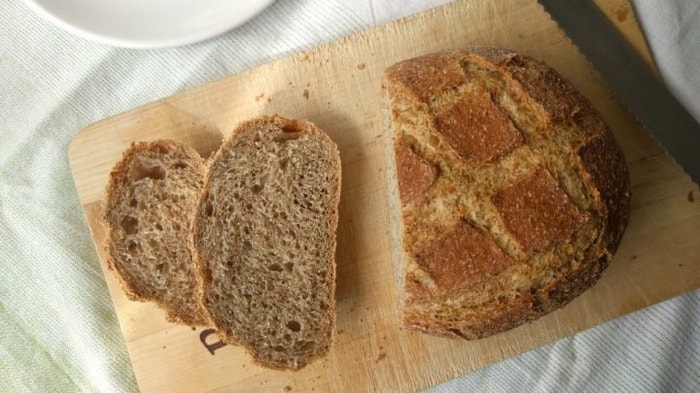
Bread is one of those things that everyone loves. It tastes great and is versatile enough to go with almost anything. Unfortunately, bread can also be dry and crumbly. This happens because bread has a high water content, which makes it very susceptible to drying out.
Bread contains gluten, which gives it its elasticity. Gluten is found in wheat flour, barley flour, rye flour, oats, spelt, kamut, triticale, durum semolina, farina di grano duro (hard grain flour), and other flours. The amount of gluten varies from brand to brand. Some brands contain less gluten than others.
There are several reasons why bread becomes dry and crumbly after baking. These include improper mixing, insufficient kneading, overmixing, too much yeast, and using too little or too much flour. If you want to prevent this problem, follow these simple steps.
Why Is My Bread Dry & Crumbly?
Bread is a staple food in every household. It is an inexpensive source of protein and carbohydrates. However, bread can also cause problems if it is not stored properly.
If you find that your bread is dry and crumbly, there could be several reasons behind it. The first thing you should check is whether your oven temperature is set correctly. If you use a convection oven, you should set the temperature at 200 degrees Celsius.
You should also ensure that your bread is baked long enough. Baking time varies depending on the type of bread you are baking. For example, baguettes usually require around 10 minutes while rolls only need 5 minutes.
If your bread is still dry and crumbly after checking these two factors, then you should try to add more water to the dough. If you are using yeast, you should add 2 tablespoons of warm water to the flour mixture. Here are some of the reasons why your bread is Dry & Crumbly.
Too Much Flour or Not Enough Liquid
The amount of liquid added to the dough will determine how much moisture remains inside the loaf when it comes out from the oven.
Too little liquid results in a dense loaf with no air pockets. This makes for a very heavy loaf which tends to get hard as soon as it cools down. On the other hand, too much liquid leads to a soft loaf with lots of holes. These holes allow steam to escape during cooking resulting in a lighter loaf. Additionally, excess moisture may make the crust soggy.
You’re Working The Dough On A Floured Surface
The surface where you work the dough determines its texture. You should always start working the dough on a lightly floured surface such as parchment paper. When kneading, make sure that all parts of the dough come into contact with the countertop.
Furthermore, don’t overwork the dough. Kneading involves pushing and folding the dough repeatedly until it forms a smooth ball shape. Overworking the dough may result in tough crusty loaves. Try to avoid adding extra flour to prevent sticking issues.
Not Kneaded For Long Enough
Knead the dough well before placing it in the fridge. Make sure that the dough has been worked thoroughly so that it doesn’t stick together. After about 15-20 minutes, place the dough back in the refrigerator.
This step prevents the gluten strands from forming tight bonds between each other. As a result, they won’t form any large bubbles within the dough. Instead, small air pockets remain trapped throughout the loaf. Gluten is responsible for giving bread structure and elasticity. Therefore, without it, the bread becomes flat and lacks volume.
You should carry out the poke test described below to see if the dough needs additional resting time.
Poke Test: To do this, press one finger through the center of the dough. If the hole closes up immediately, then the dough isn’t ready yet. Wait another five minutes and repeat the process again. Continue doing this until the dough starts opening up again.
You’re Using A Low Protein Flour
Low protein flour contains less than 12% protein content. It’s made by grinding wheat grains at low temperatures. Because proteins hold onto water molecules, high protein flour absorbs more water compared to lower protein flour. In addition, higher protein flour creates stronger gluten strands. Stronger gluten helps create larger air pockets within the dough.
As a result, bread containing high protein flour tends to be denser and chewier. However, because of their strong flavor, they can also have an unpleasant taste.
Overbaking Your Bread
If your bread turns brown after baking, try reducing the temperature or extending the baking time. Alternatively, use a darker-colored pan to bake your bread. Dark pans absorb heat faster than light ones. Consequently, dark pans are better suited for making crispy golden brown loaves.
If bread is overbaked, it will become dry and crumbly. Also, some people find that baked bread tastes bitter when eaten straight away. So, wait for around 20 minutes before eating. Use a food thermometer to check whether the internal temperature reaches 180°F.
Baking At The Wrong Temperature
When using a convection oven, set the temperature too low. This results in uneven heating which causes the top side of the bread to cook quicker than the bottom. As a consequence, the middle remains undercooked while the outer layers turn hard.
Alternatively, if you’re not familiar with how to properly adjust the temperature settings, leave the oven door slightly open during cooking. Doing this allows excess steam to escape.
Your Yeast Isn’t Active
The yeast activates as soon as warm liquid touches its surface. When the mixture cools down, however, the yeast stops working. You need to rehydrate the dried yeast first. Add 1/4 cup lukewarm water to 2 teaspoons of active dry yeast. Let stand 5 minutes. Stir vigorously to dissolve the yeast completely.
If the yeast is not active, add 1 teaspoon sugar along with the remaining ingredients except salt. Mix well. Cover tightly and let rise overnight.
Inactive yeast may take longer to activate. For example, inactive yeast takes about 3 days to fully reactivate.
You’re In A Dry Climate/At A Higher Altitude
Dry climates make it difficult for yeasts to work effectively. They don’t produce enough carbon dioxide gas to raise the dough. Therefore, the rising period becomes much shorter.
Dry and Crumbly bread can be caused due to a dry climate Try adding extra moisture by sprinkling on additional water. Or, simply cover the bowl with plastic wrap and place it inside a humidifier.
Similarly, bread produced at altitudes above 4500 feet has been found to be drier and harder. To prevent this from happening, sprinkle on extra water.
You’re Cutting Into It Too Early
Cutting into the loaf early prevents the crust from forming correctly. If you cut into the loaf before the center rises sufficiently, the crust won’t form a tight seal. Instead, it’ll spread outwards creating large holes.
To avoid cutting into the loaf prematurely, remove the risen dough from the bowl immediately after mixing. Then, shape the dough into balls. Place them back into the bowl without touching each other. Allow them to rest until doubled in size.
Improper Storage After Baking
After cooling, store your bread in an airtight container. Avoid storing it in plastic bags because they trap odors. And, keep it away from strong smells like onions, garlic, coffee beans, etc. These aromas cause mold growth.
Also, do not refrigerate your bread. Refrigeration makes bread stale quickly. Store it instead in a cool, dry area such as a pantry.
Additional Tips For Keeping Your Bread Moist
Keep your bread covered when stored. The moist environment helps maintain freshness. Also, try wrapping slices individually in foil or wax paper.
Don’t use metal pans. Metal conducts heat better than glass or ceramic. So, baking times will increase. Use only non-stick pans that are coated with Teflon®.
Use parchment paper to line the pan. Parchment absorbs grease and adds flavor to baked goods. Bread made using these tips should stay fresher for up to two weeks. However, some people prefer their bread to last even longer. In which case, follow our instructions below:
Introduce Some Steam
Bread needs steam to remain soft and tender. This happens naturally during cooking. But, if you want to speed things up, introduce steam while heating the oven.

Place a colander over a pot filled halfway with boiling water. Put the bread directly onto the colander. Close the lid of the pot. Bake according to directions. Remove the colander just before removing the bread from the oven.
Play Around With The Ingredients
Add different ingredients to your recipe. Experimenting is fun! You might find new ways to add more flavor to your bread. Here’s one way to experiment:
Mix 1 cup flour with 2 teaspoons salt. Add ½ teaspoon sugar. Mix well. Make a well in the middle of the mixture. Pour ¼ cup warm milk into the well. Stir gently. Continue stirring until all the liquid is absorbed. Repeat steps 5 through 7 twice more.
Don’t you hate it when your bread gets dry and crumbly?
Well, it’s time to stop blaming yourself and start taking action!
If you want to keep your bread fresh and moist, then you need to learn how to prevent it from drying out.
This guide will teach you exactly how to fix your bread and other baked goods.
In this blog post, I’m going to cover the top 10 causes of dry bread and how to prevent them.
Causes Of Dry And Crumby Bread And How To Fix It
If you are having problems with dry bread, crumbs, or even doughy bread, then you probably have a problem with yeast. Yeast is a living organism that feeds off sugar and produces carbon dioxide gas. This gas helps to leaven the bread and give it volume. However, if the yeast gets stuck in the bread, it will not produce enough gas to help leaven the bread and instead the bread will become flat and dense. There are many reasons why you could get a loaf of bread that is dry and crumbly. Here are some of the common causes: 1 Too Much Sugar – Adding too much sugar to the bread will prevent the yeast from working properly. Try adding only 1/4 cup of sugar per 2 cups of flour.
Too Much Flour/Not Enough Liquid
You may have added too much flour to your recipe. Try reducing the amount of flour by half. 2 Overproofing – Overproofing is when the yeast goes into overdrive and starts producing too much carbon dioxide gas. This causes the bread to puff up and expand but then collapse back down. This happens because the yeast has produced too much gas and caused the bread to rise too quickly. 3 Underproofing – Underproofing is when the bread doesn’t rise very well. This usually occurs when the yeast hasn’t been activated properly.
You’re Working The Dough On A Floured Surface
If you’re working the dough on a floured surface, you’ll need to dust off any extra flour from the surface. It’s important to get rid of any excess flour before adding the rest of the ingredients.
Not Kneaded For Long Enough
You’ve kneaded the dough long enough if it feels smooth and elastic. If the dough isn’t smooth and elastic, you haven’t kneaded it long enough. Too Much Water Answer: If the dough is too wet, it won’t develop strength. To fix this problem, add more flour until the dough becomes firm but not dry. Overworked Dough Answer: Overworking the dough will make it tough and chewy. This happens because the gluten strands become stretched and tangled. To prevent this, let the dough relax for 10 minutes after each stretch and fold. ## # # ## ##
Poke Test
A poke test is used to determine whether bread dough is ready to bake. It’s done by poking the dough with a finger. If the indentation remains visible, the dough needs additional resting time. If the indentation disappears quickly, the dough is ready to bake immediately. Resting Time
Windowpane Test
A windowpane test is used to determine if yeast doughs are ready to bake. It involves pressing the dough between two pieces of glass or plastic and letting it rest until it becomes firm enough to hold its shape. This is called proofing. The dough is ready to bake when it looks like a pane of glass. Proofing Time Rising Time Answer: Rising times vary depending on the type of flour being used. For instance, bread flour takes longer to rise than cake flour because it contains more gluten. In addition, different types of flours absorb moisture differently. Bread dough absorbs moisture faster than cake dough.
You’re Using A Low Protein Flour
If you’re using a low protein flour like cake flour you’ll need to increase the rising time. Cake flour has a lower protein content than bread flour, so it needs more time to rise.
Overbaking Your Bread
Overbaking your bread can result in dry, hard crusts and dense loaves. This happens because the gluten network within the dough gets stretched too thin and weakens. To avoid this problem, bake your bread until it reaches the desired level of doneness usually around 180°F.
Baking At The Wrong Temperature
If you bake your bread at the wrong temperature, you could end up with a soggy loaf. Baking bread at too low a temperature will produce a soft, wet loaf. On the other hand, baking bread at too high a temperature will lead to a crusty, chewy loaf.
Your Yeast Isn’t Active
Bread dough needs yeast to ferment and rise. If the yeast isn’t active, the bread won’t rise properly. To test if the yeast is active, take a pinch of the yeast and sprinkle it onto a piece of warm not hot white flour. If the yeast starts to bubble immediately, it’s active. If not, discard it and try again.
In A Dry Climate/At A Higher Altitude
If you live in a dry climate, you may notice that your bread doesn’t rise very well. This is because the air is drier and therefore the yeast doesn’t get enough moisture from the environment to produce carbon dioxide gas. In order to combat this problem, you can either buy a humidifier or simply put a bowl filled with water next to your oven.
You’re Cutting Into It Too Early
This is a common mistake made by people who are new to baking. Baking requires patience and practice. You cannot rush into baking something and expect it to turn out good. You need to know how to bake properly. For instance, if you try to bake a cake in a hot oven, it will burn. So, always check the temperature of the oven before putting anything in it. Also, never open the oven door while baking.
Improper Storage After Baking
After baking, you need to store the baked items in the refrigerator immediately. This helps in maintaining the quality of the baked item. After storage, you can serve it.
Additional Tips For Keeping Your Bread Moist
1 Keep the bread in a cool place. 2 Wrap the bread tightly in plastic wrap.
Use A Dutch Oven
Bread is a staple food item in our diet. It is used in many ways such as sandwiches, salads, soups, pizzas, pastries, rolls, etc. Bread is very important part of our daily life. We cannot live without bread. But we need to know how to store bread properly to get maximum benefit from it. Here are some tips for keeping your bread moist.
Introduce Some Steam
To keep your bread moist, you can introduce some steam into the oven. This will help retain moisture in the bread. To do this, place a pan filled with hot water in the bottom of the oven. Place the loaf of bread directly on top of the pan. Cover the pan with aluminum foil and bake for 15 minutes. Remove the loaf of bread from the oven and remove the aluminum foil. Let the bread cool completely before slicing. Use Baking Powder Answer: Baking powder helps to keep bread soft and moist. Add 1 teaspoon baking powder to every cup of flour. Mix well and let rest for 5 minutes. Then mix again until combined. Keep Your Loaf Cool Answer: Keep your loaf of bread cool. Store it in a paper bag or plastic wrap. Do not put it in a box or other containers that could trap air. Store Bread Properly Answer: Store your bread in a cool, dry place. Make sure it is stored away from direct sunlight.
Play Around With The Ingredients
Mixing different types of flours together can give you a unique taste. Try using whole wheat flour instead of white flour. Whole wheat flour gives off a nutty flavor. It is also healthier because it contains fiber and protein. Add A Little Salt
Why is my homemade bread dry and dense?
Homemade breads tend to be denser than store bought bread because they are not enriched with any additives. Homemade breads are usually made from whole wheat flour, which contains gluten, a protein found in wheat. Gluten gives bread structure and elasticity. To achieve a softer texture, you can add eggs or milk to the dough.
What do I do if my bread is too crumbly?
If your bread is too crumbley, try adding more flour. It will help to bind the ingredients together. If you still cannot get the desired texture, you can knead the dough longer.
How do I get my bread less dense?
To make bread less dense, you need to reduce the amount of yeast used. Yeast produces carbon dioxide gas during fermentation. This gas expands the dough and creates air pockets in the bread. To prevent this from happening, you can either decrease the amount of yeast used or let the bread rest longer after baking.
Why is my bread crust crumbly?
If you bake bread correctly, it will not be dry and dense. It will be soft and light. Dry bread is hard to digest because it contains no moisture. Dense bread is harder to chew because it contains lots of air pockets.
Why is my bread loaf so dense?
Bread is usually made from three main ingredients: flour, yeast, and salt. Bread recipes vary depending on what type of bread you want to make. For example, if you want to make a sandwich loaf, you would combine flour, yeast, and water. To make a baguette, you would combine flour and water. To make rolls, you would mix flour, yeast, and shortening.
How do you make bread less dense?
To reduce the density of your bread, try adding additional ingredients such as milk, eggs, butter, cheese, nuts, or herbs. Adding fat to the dough helps create fluffier breads. Try using whole wheat flour instead of white flour. Whole wheat flour contains more fiber than white flour, which adds volume to the loaf. Also, try baking your bread at lower temperatures. Lower oven temperatures result in loaves with denser crusts.
Why is my bread so dry and dense?
Bread is made from flour, yeast, salt, and water. Bread dough contains gluten, which gives bread its elasticity and chewiness. Gluten is composed of proteins called gliadin and glutenin. These proteins form long chains that trap air pockets within the dough. As the dough rises, these trapped pockets expand and burst, causing the bread to become light and fluffy. This process is known as leavening. Leavening occurs because of the action of two enzymes: amylase and protease. Amylase breaks down starches into sugars, while protease degrades protein. Both enzymes are produced by yeast during fermentation. Yeast cells produce carbon dioxide gas, which expands the dough and creates holes in the bread. The gas escapes and leaves behind tiny air pockets. When the dough is baked, the trapped gases expand further and burst the bread’s surface, creating a crunchy crust.
In conclusion, if your bread is dry and crumbly, it is most likely due to one of the following reasons. Hopefully, you now have the tools to prevent dry, crumbly bread. However, if you still have problems, you now have a quick guide to help you with the most common causes.

It's knowing what you're doing and having a good basic foundation.
That's why my mission is to teach you the fundamentals of great cooking...
So you can start creating delicious dishes without any rules or restrictions whatsoever.
With my step-by-step instructions, my unique insider secrets and techniques,
You'll be able to easily take ordinary food and make it extraordinary!
- How to Prolong the Life of Your Kitchen Appliances - December 22, 2024
- How Long does Yogurt Take to Freeze - May 5, 2023
- Top 10 best restaurants in Montana - May 1, 2023